Hi all :-)
Too long, didn’t read: here is the time lapse!
I have not found any information on "the internet" about the full spectrum conversion of 'recent' Pentax cameras. So here is a little feedback.
Firstly, what is a full-spectrum conversion and why should I care? You might know (or not) that camera sensors are sensitive to infrared light (IR). But as the human eye is insensitive to these wavelengths, camera manufacturers install an IR-cut filter in front of the sensor. There are some exceptions, such as the Canon 20Da, 60Da and Nikon D810A, but this is a minority. The Canons are obsolete and the D810A… well… I want one but I can’t afford it!

and it’s way less fun!
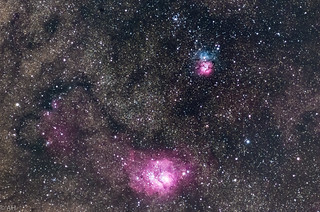
… so, why should I care? There are two domains in which this filter is an issue. Infrared photography and astronomy. I have never done IR photography, but it seems fun and you can easily understand why an IR blocking filter in front of the sensor can be problematic. My main interest lies in astrophotography: nebulae do emit light in the very far-red spectrum (Hydrogen alpha) and this light is mainly blocked by this filter. This is why removing it yields much better images! This is why I tried (and succeeded) to remove this annoying filter.
But why Pentax? There are hundreds of tutorials for Canon, it is easy and well documented and tethering is supported! (Yes Pentax! I’m mad at you!!). Just because of the sensors! (and also because I found this bargain!)
First, what you need to know:
- You might damage some functions, be careful!
- You WILL lose phase detection autofocus
- Focus to infinity might be a problem with some lenses (!)
- Obviously, the color rendering will be totally screwed up! Even a custom white balance would not help!
- Obviously, you will lose warranty and you play at your own risk!
This isn’t full tutorial, as I had no idea what I would find inside, so I’m unable to write a full step-by-step tutorial with pictures. However, here are some key points:
- Be aware of the risks you are taking. This has taken me several hours… And there are a lot of different screws! Work on a big table in a clean environment. Take pictures to know how to reassemble the camera.
- Required tools: small screwdrivers, little (ing) IMPERIAL (!!) Allen wrench, tweezers, storage boxes or bags (a lot of different screws), a small soldering iron and some skills (intermediate or good, definitely not beginner)
- Start by removing the lower cap of the body, super easy !
- Removing the back is somewhat trickier. You have to use a flat screwdriver between the back and the front plate. Start left (seen from behind) and then right. Removing the top assembly might help (see later). There are two lids on both sides of the viewfinder. The back plate has to slide downwards in order to be removed.

- It’s not yet mandatory to remove the top assembly, but if you want to do it right now, there is a screw hidden behind the rubber part next to the AF selector. Also, don’t forget the screws in the flash… It’s one full assembly, so be careful not to damage the wires.

- Once you have removed the back cover, you will see the green motherboard. The sensor is right behind and you can see/hear it move.

- Removing the card seems mandatory to access the sensor. Maybe it is possible through the other side, but I have my doubts!! I had to desolder all the little cables at the lower right-hand side. Be careful to know which goes where for reassembly. Take also care of the routing of those cables.
- At this stage, it is necessary to remove the upper assembly to access the sensor block. It is maybe not the case I you choose to desolder the upper cables.
- Lift the green motherboard and you will have access to the screws holding the sensor assembly. There are little blocking screws which you can remove with a screwdriver. The other screws are spring-mounted Allen screws and are sealed in glue. You can remove those screws but be aware that those screws are used to keep the sensor parallel to the lens mount and probably used for calibrating the phase detection AF. I tried to note how many turns were needed to unscrew them, but as their pitch was very small, I didn’t notice exactly when they were unscrewed. It was something between 10 and 13 turns.
EDIT: The main mistake you (I) made is unscrewing 3 glued Allen screws from sensor block. It is better to screw them completely to the end first and to measure how much rotations you need. Thanks Medex (here below!)

- You now have access to the sensor assembly. It is not very easy to remove, but it’s ok… There are two screws to remove the filter holder. Between the filter(holder) and the sensor lies a thin square plastic window which I placed back upon reassembly. I’m not sure if it is possible to remove the filter from its holder without damaging it or its holder. There are in fact two laminated (glued) filter: the IR filter (just on top of the sensor) and a clear (low pass ???) filter with the piezo strips attached to it. I don't think it is possible to separate those two filters, so braking it (as I did) is not an issue. I also cut the piezo wire, by the way. Tis allow not to damage the filter holder (too much). This filter could (?) however be replaced by an Astrodon or Baader filter in order to take pictures ‘in daylight’ and to keep the PDAF functioning. One should then take care of filter thickness AND sensor reassembly (for PDAF)!!


- The sensor assembly and reassembly is not very easy to handle as it wobbles in the SR mechanism! But it's fun! Just be patient and use tweezers. Try to keep the sensor clean!
- Now reassembly! It's way less fun than reassembly! There are two «tricky» parts:
- The sensor assy should be calibrated. As I didn’t know of how many turns I unscrewed them, and more importantly because the filter was removed, I just screwed them back to their maximum. It was about 15 turns. I still have to investigate it, but the sensor plane looks good!
- Resoldering all the tiny wires. Just be patient and be careful about which one to handle first! Be also careful for the cable routing.
Some conclusions:
I wasn’t very confident, but it’s a big success! It’s not as easy as a Canon, but it’s certainly doable!
The sensor seems parallel to the mount, so no out of focus parts. Still have to test on a dark sky, though!
PDAF is, of course, lost. And there is no contrast detection AF. That’s a little disappointing!
I have lost infinity focus on the 35 mm f/2.4; an UV filter does not help.
Infinity focus on the 100 f/2.8 macro is still ok but by a hair!

It's also ok on the Sigma 17-50 f/2.8 (zoom lenses should be fine, in genreal)
I have to test on other lenses (sigma 50 f/1.4, Pentax DA* 300 mm f/4) ! In general, lenses without some headroom past the infinity mark might be problematic.


 Worst case, it was about 190 euros for a couple of hours of fun. Not cheap, but I can could live with it.


 Post #1 by Azergoth
 Similar Threads


