Forgot Password
Pentax Camera Forums Home
 

Reply
Show Printable Version 35 Likes Search this Thread
16 Likes  #1
Tutorial: Repair E-Dials Pentax K7 / K5 / K5II / K3 and possibly others
Posted By: photogem, 01-10-2021, 03:31 AM

For: K7 / K5 / K5II /K5IIs / K3 / K3II (most likely KP as well)

The E-Dials of the professional Pentax bodies are different to those in the entry cameras.
I haven't checked yet on the K30/50/500 nor K-S1/K-S2/K-70 but those will either be similar as you can read in THIS TUTORIAL or similar to the K5/7/3 etc.

Disassembling is very easy because with the K7 and K3 only the TOP needs to come off for both E-Dials.
For the K5-Series the top-cover off will only give you access to the back E-Dial!

For the front-E-Dial of the K5-series
read HERE for more detailed instructions

Best to make some simple drawings or print photos of all sides and glue those onto a piece of cardboard.
Markings where the screws are located, pinch 2mm holes and then stick the screws inside there.
Tools:

- JIS 00 or 000 screwdriver: I use the Vessel 9902-set because I like the length which is usefull for the solenoid repairs as well as for the screw inside the battery-chamber. I don't like the Vessel T-Series very much, too flimsy and not strong enough. But a PH00 will do as well!

- DeoxIT FaderLube: But no contact cleaner. Avoid like hell!
- very small flat-blade screwdriver if you want to clean the ISO and EV buttons as well (which is sensible)


Warning: Although the contacts of the flash-condensor are well hidden behind the front-cover and thus there is not the usual shock-hazard as when the body is completly disassembled: Do not poke around in the flash-region itself, neither swallow the Li-Ion battery nor any other parts, because this might lead to different hazards which you definitely want to avoid! Not so if you work on the front E-Dial of the K5 Series. But this is explained in the given link!


1. Two screws behind the rubber eyecup:


2. Open pop-up-flash: Two screws there:


3. One screw deep inside the battery-chamber:


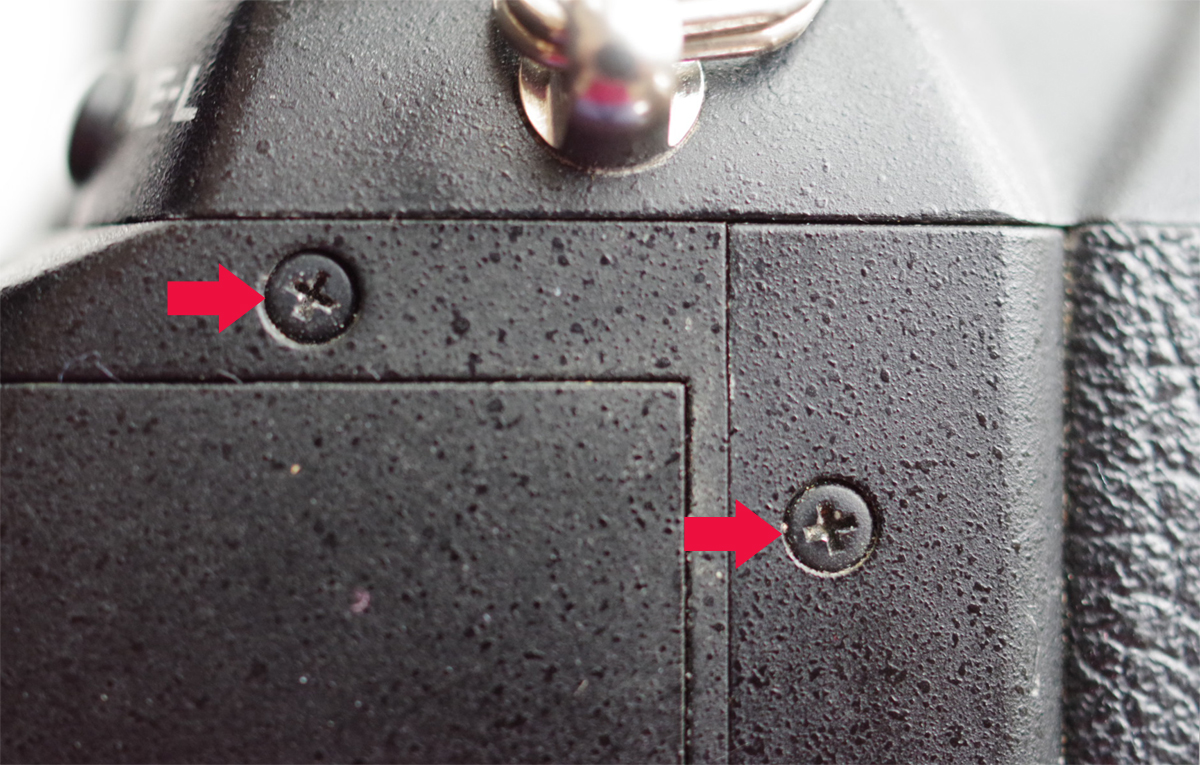
4. Two screws right side (grip):


5. Three screws left side (one is hidden underneath the rubber = green arrow):


Here the hidden one again (left red arrow):

You don't need to unscrew the one right behind the X-Sync-Socket (blue arrow) ! Only necessary if you want to take the front off!
But if ever you want to take the front off: There are two wires connected to the X-Sync-Socket. You then also need to unscrew another screw holding the tiny circuit-board behind that socket with those 2 wires! Then you pull the circuit board off and only then you can take the front off!


Now you can lift the TOP of your Pentax but be carefull, there are wires and flat-ribbon-cables!
Carefully place it on the left side without bending/hurting the cables/wires! Not difficult, just some care needed.

6. Three screws for the Top-LCD:


7. Two screws for the "Back-E-Dial", here the K7, which is slighly different to the K5 and K3:


8. Two screws for the "Front-E-Dial"
a) K-7:


b) K-5 and K-3:


c) One screw on the backside of the Front-E-Dial:


9. The E-Dial taken off (showing the ALPS-plastic-film-conductor potentiometer):


- Spray a tiny amound of "DeoxIT FaderLube" onto this tiny potentiometer which sits on the green board. This is important, don't use any other stuff because only this quite expensive FaderLube is designed for plastic-film potentiometers! I tried once a high quality spray (Contact-Gold-2000) designed for normal potentiometers on a K-7 and after a few month the problem was worse: As far as I know DeosIt FL is the only one clearly defined for film-potentiometers. So really don't be mean there but get the proper stuff!

- Clean leftovers right away off and mount it back onto the wheel with the 3 screws, turn the wheel several times into both directions!

- Same procedure for the front-E-Dial (I would always do both, even if it is just one not working alright!)


10. As you are already that far and the top-cover is lose, you now can clean the EV- and ISO-Buttons as well,
remove the three screws and clean them just with some isopropyl-alcohol or similar:

Each button is fixed with a tiny retaining ring (radial e-clip). You just losen it with a tiny flat-blade screwdriver and make sure, it doesn't jump off!
So this white blanket under the camera is a good idea.


Of course it makes sense to clean the ON/OFF-SWITCH at the same time at the same time with isopropyl-alcohol as well:
Use a cotton-swab and rub the lower-part carefully, another cotton-swap for those 3 fingers with 2 contact-points on each but only from the back to the front, so that you avoid bending them! They are a bit sensitive and must stay exactly in their position! Not that one bends them easely but they are made out of gold-plated beryllium-copper (spring-copper) which is strong and durable but I have seen some bent ones, then they need to be replaced. So just some care is needed.

Re-assemble everything

and enjoy how smooth the E-Dials work again!

I wrote a "DSLR-Specific" tutorial for each of them:
K-5 and K-7
K-3

Last edited by photogem; 12-06-2022 at 12:02 PM. Reason: further information added
Views: 8,079
01-10-2021, 04:30 AM - 1 Like   #2
Digitiser of Film
Loyal Site Supporter
BigMackCam's Avatar

Join Date: Mar 2010
Location: North East of England
Posts: 20,676
Thank you, Heinrich, for another very helpful tutorial in the service of our community!

My more modern cameras are all doing fine, but I have a nice, low-shutter-count *ist DL that I picked up maybe three or four years ago, and the e-dial skips a notch or two - usually at the same position each time. I've been meaning to address it for some time, but I've been lazy. Your tutorial is just the encouragement and help I need

Incidentally, I own two sets of the Vessel JIS screwdrivers, and they're good - but even with the rubber grips, it can be difficult to get enough leverage to undo very tightly seated screws... plus, the shafts can twist and bend under torque - especially with the smaller sizes. A better choice, in my experience, is one of the excellent-quality iFixIt kits that include JIS bits. I received one as a birthday gift in 2018, and it's the best screwdriver set I've owned for electronics repair. I've used a number of the bits - JIS, philips, flat blade, torx - numerous times now, and the performance is excellent. Highly recommended.
01-10-2021, 05:16 AM - 1 Like   #3
Pentaxian


Join Date: Mar 2019
Photos: Gallery | Albums
Posts: 466
QuoteOriginally posted by BigMackCam Quote
My more modern cameras are all doing fine, but I have a nice, low-shutter-count *ist DL that I picked up maybe three or four years ago, and the e-dial skips a notch or two
Hi Mike, I used this *ist DS instruction in order to disassemble my K100D to get access to the dial wheel. The location of the screws is nearly identical so it was helpful for me. A thing I learned from reading through both parts is to be careful not to loose the little ball sitting on the wheel which makes the wheel click.
Thought it might be useful with your *ist DL too.

How to fix Pentax ist* D DS DL Camera: Pentax ist* DS disassembling, part 1 of 2
01-10-2021, 05:26 AM - 1 Like   #4
Digitiser of Film
Loyal Site Supporter
BigMackCam's Avatar

Join Date: Mar 2010
Location: North East of England
Posts: 20,676
QuoteOriginally posted by Simon K Quote
Hi Mike, I used this *ist DS instruction in order to disassemble my K100D to get access to the dial wheel. The location of the screws is nearly identical so it was helpful for me. A thing I learned from reading through both parts is to be careful not to loose the little ball sitting on the wheel which makes the wheel click.
Thought it might be useful with your *ist DL too.

How to fix Pentax ist* D DS DL Camera: Pentax ist* DS disassembling, part 1 of 2
Thank you kindly, Simon - that's very helpful indeed! Much appreciated, sir

I have a couple of chores to do this afternoon, but if I get time I might have a go at this tonight

01-10-2021, 05:39 AM - 1 Like   #5
Pentaxian


Join Date: Mar 2019
Photos: Gallery | Albums
Posts: 466
QuoteOriginally posted by BigMackCam Quote
if I get time I might have a go at this
You're welcome, Mike. Wish you good success with the project.
01-10-2021, 01:09 PM   #6
Loyal Site Supporter
kiwi_jono's Avatar

Join Date: Dec 2009
Location: Christchurch, New Zealand
Photos: Gallery | Albums
Posts: 2,437
Thanks! I don't need the instructions yet but they greatly appreciated, as this is the sort job I'm happy to do.
01-10-2021, 01:43 PM   #7
Veteran Member
dcpropilot's Avatar

Join Date: Mar 2010
Location: Vermont
Photos: Gallery | Albums
Posts: 941
Does this void the warranty?

01-10-2021, 06:52 PM   #8
Site Supporter
Site Supporter
ramseybuckeye's Avatar

Join Date: Apr 2009
Location: Hampstead, NC
Photos: Gallery
Posts: 17,292
I hope I never need this, but thanks and great tutorial!
01-10-2021, 07:17 PM   #9
Site Supporter
Site Supporter


Join Date: Jun 2010
Location: Central Coast, CA
Posts: 1,315
K3,K5 and K7 etc. are all past warranty. It does, if they can tell you worked on it.
01-10-2021, 09:39 PM   #10
Veteran Member


Join Date: Jan 2019
Posts: 554
Thanks for posting this. Probably very few need this right now but for years to come people doing internet searches on this issue will benefit from your effort. Doesn’t look like to difficult of a fix.
01-11-2021, 06:21 AM   #11
Pentaxian
rangercarp's Avatar

Join Date: Oct 2012
Location: Southern Michigan
Posts: 437
I have a k5IIs with a malfunctioning mode dial. Would this work for fixing that as well?
01-11-2021, 06:55 AM - 3 Likes   #12
Senior Member
Dale H. Cook's Avatar

Join Date: Mar 2019
Location: Roanoke, VA
Posts: 174
QuoteOriginally posted by photogem Quote
- Spray a tiny amound of a good contact cleaner such as "Contact Gold 2000" onto this tiny part which sits on the green board (Teslanol T6 or any other good contact cleaner should do as well)
That "tiny part" appears to be a trimmer potentiometer. If that is what it is contact cleaner is the wrong chemical to use on it. Many contact cleaners will damage some potentiometers and hasten their demise. Contact cleaners are designed for metal-to-metal contacts such as those in switches and relays. For potentiometers you need a cleaner designed for the conductive tracks used in potentiometers and linear faders. As a professional broadcast studio and transmitter engineer with 50+ years of experience I use DeoxIT FaderLube for such purposes - it is designed for conductive control surfaces.

Dale H. Cook, Radio Contract Engineer, Roanoke/Lynchburg, VA
Star City Radio Tools
01-11-2021, 08:17 AM - 2 Likes   #13
Site Supporter
Site Supporter


Join Date: Apr 2015
Posts: 3,521
Original Poster
QuoteOriginally posted by Dale H. Cook Quote
That "tiny part" appears to be a trimmer potentiometer. If that is what it is contact cleaner is the wrong chemical to use on it. Many contact cleaners will damage some potentiometers and hasten their demise. Contact cleaners are designed for metal-to-metal contacts such as those in switches and relays. For potentiometers you need a cleaner designed for the conductive tracks used in potentiometers and linear faders. As a professional broadcast studio and transmitter engineer with 50+ years of experience I use DeoxIT FaderLube for such purposes - it is designed for conductive control surfaces.

Dale H. Cook, Radio Contract Engineer, Roanoke/Lynchburg, VA
Star City Radio Tools
Yes, fully agreed and I didn't notice that Teslanol T6 is not a tuner spray as I am using it since decades when I wrote in the beginning of the tutorial:
QuoteOriginally posted by photogem Quote
Tools....... No soldering needed, no cleaning agents but a good contact spray such as Contact Gold 2000 or Teslanol T6 Oszillin contact cleaner and tuner spray. Any tuner spray will be fine!
Thank you, this is very important and the way to learn!

Here in Europe we use since decades Contact Chemie Tuner 600 which is recommended for very sensitive tuners.
I have a little bit experience with high-quality professional broadcasting receivers such as the Rohde@Schwarz Ballempfänger and similar ones made by Maihak and Telefunken plus many US tuners by H.H. Scott such as the 310E as well as the 4310 and the early 310A in my house, same for the Fisher FM1000, McIntosh MR71, Marantz 10B and several others. We had all the equipment to align them properly as well but this is now a while ago, FM radio is not that interesing anymore, quality has gone down dramatically (the way I conceive quality)


I have often warned in this forum, normal contact cleaners are killers, I was not aware that Teslanol T6 Oszilling is more a normal contact cleaner
because here in Europe a "tuner-spray" is for the most sensitive equipment, but you please correct me if there is more to learn or know or if I am wrong!


Sadly I never heard of DeoxIT FaderLube before, I am pretty sure it would be in my house if I'd known about it, it sounds very promising:
Possibly I never came across it because potentiometers I have used in the past were mainly made by ALPS or Noble
and some Suisse manufacturers and for Audio and studio-equipment.
But some of those were Cermet potentiometers and in those rare occasions I needed it used Contact Gold 2000 with success.

Anyway: DeosIT FaderLube will be one of my next acquisitions for sure!

@BigMacCam:
It is long time ago that I completly disassembled an *istD or *istDS but in a few days a defunct Samsung GX1s shall arrive which is similar to the *istDS2. So I will check about the access for those trimmer potentiometers.
If my memory didn't "fade" I think it is more complex and different to the K100D.
But I could be wrong.

About Vessel JIS screwdrivers. I use the long Vessel 9902 which are very different to the T-Series by Vessel.
I need their length for the solenoid repairs and am very happy with them. Never had any problems.
I have highly rated Wiha Picofinish PH0, 00, 000 here as well Facom Microtech.
But those are PH and not JIS. The Moody Tools JIS-set I cannot recommend. Inferior to Vessel 9902.

Last edited by photogem; 01-11-2021 at 08:50 AM.
01-12-2021, 07:05 AM - 2 Likes   #14
Senior Member
Dale H. Cook's Avatar

Join Date: Mar 2019
Location: Roanoke, VA
Posts: 174
QuoteOriginally posted by photogem Quote
Yes, fully agreed and I didn't notice that Teslanol T6 is not a tuner spray as I am using it since decades when I wrote in the beginning of the tutorial:
Tuner spray is also the wrong chemical for potentiometers - it is a contact cleaner sold for cleaning the multi-pole switches in TV tuners.
01-12-2021, 09:07 AM   #15
Site Supporter
Site Supporter


Join Date: Apr 2015
Posts: 3,521
Original Poster
More important details added.
Reply

Bookmarks
  • Submit Thread to Facebook Facebook
  • Submit Thread to Twitter Twitter
  • Submit Thread to Digg Digg
Tags - Make this thread easier to find by adding keywords to it!
arrow, contact, diy, do it yourself, e-dials, jis, pentax, rubber, screw, screws, vessel, wheel, yourself

Similar Threads
Thread Thread Starter Forum Replies Last Post
For Sale - Sold: Manual focusing screen (Ec-L model) (k7,K5,K5II,K5IIs,K3,K30,K50,K500) palikrovol Sold Items 2 01-05-2021 07:31 AM
Is it possible to change the direction of the control dials (e-dials) on a K20D? FreddyFrog Troubleshooting and Beginner Help 3 05-16-2011 03:20 PM
Wondering if others k-5 owners have experience defective mode dials davidphoto Pentax K-5 & K-5 II 16 12-21-2010 01:46 AM


All times are GMT -7. The time now is 08:20 AM. | See also: NikonForums.com, CanonForums.com part of our network of photo forums!
  • Red (Default)
  • Green
  • Gray
  • Dark
  • Dark Yellow
  • Dark Blue
  • Old Red
  • Old Green
  • Old Gray
  • Dial-Up Style
Hello! It's great to see you back on the forum! Have you considered joining the community?
register
Creating a FREE ACCOUNT takes under a minute, removes ads, and lets you post! [Dismiss]
Top