I did some typing last night and took some more photos this morning, so here's a more comprehensive guide. First, a photo of my lens. Write down the serial number - I'll be sure to disclose my many repairs to this lens if I ever sell it.


The first step is removing the ring with the serial number and lens name on it. It unscrews using the filter threads. If the threads aren't clean, I use an old toothbrush on them. The threads can't be bent or damaged either. The friction tool is the actual professional tool, available at Micro-tools. It's a series of rubber rings that fit different filter sizes on the lens. I use the thing on the left in this photo:

It's a plumbing part. I can resize it to fit any lens. It has worked for me. Anthing that fits well against the ring, grips it well, doesn't touch the glass, and you can grip will probably work. You'll see some lenses on eBay with holes drilled in the ring for greater leverage; some people get impatient.
Here's a photo with the trim ring removed:
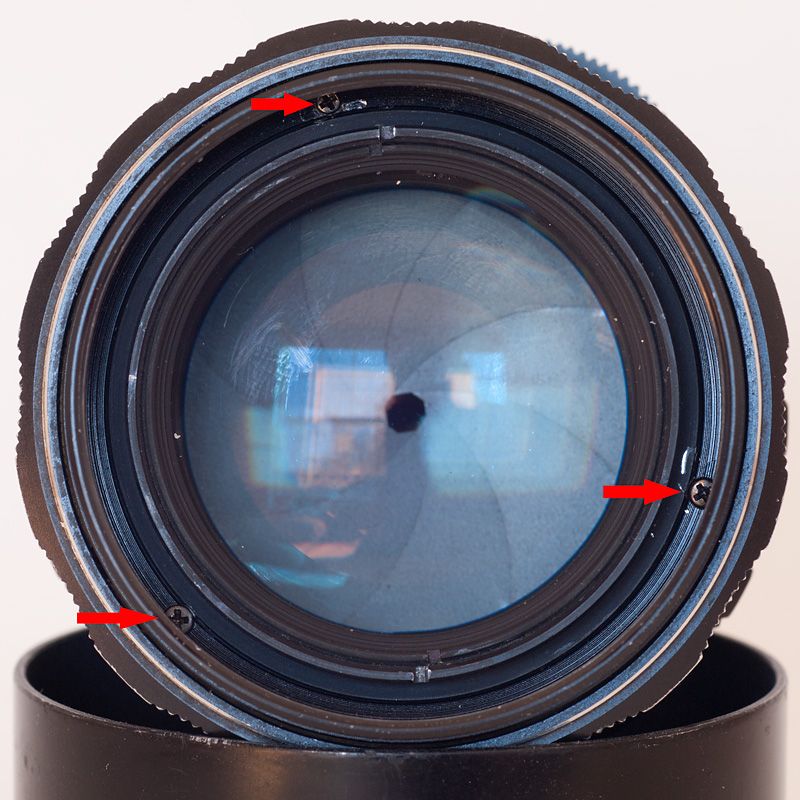
The red arrows are the screws holding the filter ring on. If your lens is a 55/1.8, it looks something like this, with six screws, three screws in little cutouts. Don't remove all six screws, only the three screws marked with arrows here.

With the filter ring removed, your lens looks something like the next photo. There are three screws holding on the focus ring, two visible in the photo and marked with red arrows. This is a good spot to mention that if you loosen these screws, you may have to realign infinity focus. If you want to avoid that, set the focus to infinity now and don't move the ring. Green arrows mark holes for the filter ring screws.

Here's the lens with the focus ring removed. The brass ring controls focus. The screw marked with an arrow is the stop screw. Steps in the focus ring run into the screw.

These are the steps in the focus ring, marked with green arrows:

Here's a photo of the problem, the unraveling distance scale. The scale has a little spring tension, and the glue sometimes only lasts for 35 years!

I thought about this last night: how can you get the scale back to the original spot? They thought of that at the factory, conveniently providing a small index mark to line up with the step in the focus ring, hidden from normal view.

After taking a lens apart this far, it's not much trouble to go further, perhaps for cleaning and regreasing the aperture ring. You'll need a tiny common screwdriver, for three screws you can see on the ring with the engraved depth of field scale and the orange diamond. (If you could remove this ring without all the other steps, it would be great, as the distance scale is right behind it. But it can't be removed until you take off the focus ring, unfortunately. The ring is holding the aperture ring in place. Loosening the tiny slotted screws allows you to lift the ring off, but don't hold the lens by the aperture ring or that will come off too. There's a spring-loaded ball bearing pinched between the aperture ring and lens body, below the orange diamond, that might try to escape. It makes the aperture ring click at each stop.
Reassembly is just reversing the steps and being careful. I normally put all three screws in when reattaching the focus ring, but only tighten one. Then I check infinity focus. I have an old film camera that I use for this, with a big split-prism viewfinder. I also have a nice view of a distant mountain range - anything more than a few miles away is fine. Maybe it doesn't need readjustment but this is the time to check. If you suspect that the focus ring moved on you in disassembly and aren't sure what position it's in now, look at the photo showing the stop screw. See how the screw holes in the brass ring are under the tabs for the filter ring screw holes? That's "beyond infinity" - the brass ring can't turn any farther that way, and the front element is as deeply recessed as it will go. That's a good starting spot for readjustment.
Then put the filter ring on, then the trim ring, and take photos.


 .
.


 Post #8 by Just1MoreDave
 Similar Threads


