|
Forum: Do-It-Yourself
12-26-2011, 02:59 AM
|
| |
Original Pentax D-AC50 adapter (for k10d, ..., k-5 DSLRs) is hard to find and expensive, especially for purchase outside US.
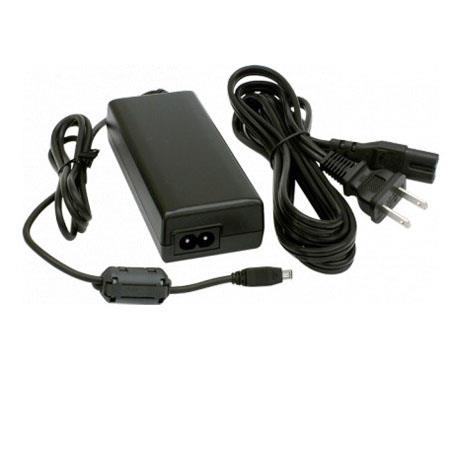
So I aimed to find a cheap replacement.
I noticed that Canon CA-570 AC power adapter ($7.98 with free shipping at ebay) has the same characteristics as D-AC50:
Input Voltage: 100V-240V AC (50-60Hz)
Output Voltage: 8.4V
Amperage: 2A

The only difference is a tricky plug used by pentax.
A little googling and I found compatible plug MQ172-3SA-CV(50) Digi-Key Part Number H10485-ND (center pin is +V and shield is GND) (only $2.99).

I assume that the way using canon adaptor is more simple than described in the DIY AC Adapter for The Pentax K10D and K20D article.
The only problem for me is that I live in Russia and digi-key does not ship to Russia.
If you are intending to assemble adapter according to this advice, please make a noble deed, purchase 2 plugs and send me one, not pro bono (I will send the plug price and S&H fee to your paypal account).
|
|
Forum: Pentax K-r
05-30-2011, 10:37 AM
|
| |
There is a frequent issue with the e-dial of K-r. When it is being rotated it does not switch corresponding parameter (apperture, exposure time) at all or sometimes shifts a parameter to undesired value. This bug is caused by a lubricant inside the wheel mechanism. Silicon oil is a dielectric. It's intended to make wheel rotating smooth, but it covers contacts of sensor inside the e-dial and prevents it from normal functioning.
Is it a mistake of developers or a hackwork of taiwan assemblers I can't say. But I can tell you how to fix it.
I have attached 3 pictures showing how to disassemble the camera.
1. Remove the battery. Unscrew the screw from the bottom of the battery bay. It is not pictured because there is only one screw and it is too dark in the battery bay.
2. Unscrew all screws from the top of the body. Couple of screws are located under the built in flash.
3. Remove the top cover. Be carefull not to tear wires and flat cables connecting elements on top cover with the rest of the body. You can disconnect a flat cable from the slot at the body side to make the top cover more mobile. On the picture you can see 3 screws holding the e-dial module. Unscrew all those screws.
4. The end of a flat cable connected to the e-dial is glued to the top cover so you will have to use some force to unglue it.
5. Now you are ready to clean the e-dial sensor. Take a pure alcohol (vodka would suit too) and a clean syringe (5-10 ml). Hold the e-dial as far from the body as possible. It would be a good idea to cover the body with something water resistant. Aim a powerful jet of an alcohol under the wheel. Repeat such wash from all four sides of e-dial module.
6. Dry the e-dial module with an air flow. I used a large squirt that I use to remove dust particles from lenses.
7. Assemble everything carefully back.
|


