|
Forum: Pentax K-30 & K-50
02-21-2017, 01:01 PM
|
| |
I hope this will be of help to those who are afraid to slightly take apart the camera, are not able to get their cameras serviced or the repair is too expensive. There are related bits of information scattered around the forums but I will try to put everything here - step by step - an easy to follow approach.
This can be applied to other cameras than K50/500 but the placement of screws can be a little bit different. In general it is the same for all models - you just have to be observant when looking for the screws.
So my approach uses an old but fully functional K100D (If you have an old camera gathering dust you can try a similar approach). I didn't want to ruin the K100 as it was in mint condition but after a long thought I figured out that I won't affect its functionality in any way. So the earlier models such as isD, K100D, K10D, K200D etc have a better quality solenoid part (it doesn't seem to fail in such large numbers) in them + they have 2 solenoids in them - other controls the flash compartment. Yes...this means less work to get the part.
Essential Tools required: Patience, 100g Vodka (HUMAN SR), Small but long screw-driver that fits the screw-heads - I suppose it is a JIS-type but you could get away with phillips, small soldering iron with rather pointy tip (low power - for electronics), tweezers (will help with the tiny screws and soldering).
PART I (Extraction from the donor_K100D).
To extract the solenoid we need to remove just the top cover
1) Press the open-flash button and don't close it. Take out the battery prior following operations.
2) If you didn't open the flash, then: Opening the flash...as it is electronic, we need to push the lock manually - for that we need something thin but rather stiff...something out of plastic works just fine. The lock is positioned on the side of the grip - so slide in the sheet of plastic inside the gap and wiggle - flash pops open.
3) Unscrewing screws -there are 8 screws to unscrew before it is possible to take off the top cover. 2 screws are hiding behind the rubber of the viewfinder (refer to Figure 1 of K500 as it is very similar) - pull the rubber part upwards to remove, next, 2 screws are in the flash compartment - that is why we opened it (Figure 2, green circles), 2 screws are each near the strap loops (Figure 2, purple circles - on K100 position is a bit different but you will find them), 1 screw is at the side of the flash compartment (Fig.3,b, purple circle)+ there is one final screw hiding in the battery compartment (Fig.4, green circle).
Figure 1

Figure 2

Figure 3

Figure 4

4) Now we can carefully take off the top cover. And what wee see - it is Fig 5.
Figure 5

5) The solenoid is held in place by one single screw - so we need to unscrew it...take notice - the contacts at the solenoid end are fixed with polymer - so it is hard to unsolder them - this is why I chose to unsolder at the board end and take out the solenoid with wires.
Figure 6

6) As can be seen in Fig 6, it is an easy task to unsolder the wires. Get your soldering iron up to the temperature and just touch the pads - if needed use tweezers and pull of the pink and purple wire. DO NOT heat the pad for prolonged time - if you didn't succeed, let it cool and try again a bit later. You don't want to overheat these pads.
Extraction completed!
Part II (getting to the green friend)
In theory you wouldn't need to remove the top cover of K50/K500 but as it is easier to change out the solenoid with wires - we will have to remove the top cover as well. Plus with loosened screws of the top cover it is easier to get off (and back in) the front cover.
1) Let's remove the bottom cover. Figure 4 - shows already removed bottom cover - take notice that some screws go inside metal and some inside plastic - so obviously threads on them are different - what I want to say - there are so many different screws in this camera - don't mess up. It is very advisable that you somehow take exact notice from which place you unscrewed a particular screw - make a sketch of the camera body if it helps or maybe you have a phenomenal memory.
So - Fig.4 purple circles are outer screws which are obvious. Blue circles show 2 screws which are underneath the battery compartment cover (so obviously you will need to open it). So Purple + Blue screws = bottom cover can be removed. Nice
2) Now the bottom cover has been removed but our goal is to remove the front cover - so underneath the bottom cover there is one more screw (green circle), which has to be unscrewed...and while we are here - undo the one inside the battery compartment (because we will need to remove the top cover as well)
4) The top cover goes the same as in the case of K100D - please refer to pictures. If you decide not to remove the top cover (somehow you have acquired fresh part and you want to solder the wires at the solenoid and not at the board), then still you need to undo screws inside flash compartment and one above RAW button (Fig.3). I would also advise to undo the top cover screw at the strap loop (Fig.2 - purple circle one the left) - it will hugely help to get the front cover back in more easily.
5) Final screws for the front cover...They are hiding beneath the rubber. (Fig 3 - green circles) - so on the right side there is one obvious screw and one underneath the rubber, but on the left side of the camera (right side of the image) - both are hidden from view. You need something sharp - I used my sharp tweezers to slightly rip of the corners (market with arrows) - the rubber sits on some sort of double sided tape, so it won't be too hard.
6) Now the screws have been undone (I really hope I didn't forget any) and it is time to remove the front cover. It sits tight. I suggest to start with the grip side - don't force it too much. But a slight force should be applied to get it off. The keyword is patience. Just to be safe - be careful with the flash capacitor (Fig.3 b shows its approximate position). If you have multimeter you can check the voltage across its terminals - If HOT..then discharge with ~10 KOhm resistor or just wait with the voltmeter attached.
7) Bingo...now we see our green friend (Figure 7). Again - you need to undo just one screw...I didn't drill any holes in the battery compartment and you don't need it either - a slight angle - when you use a long screw driver doesn't hurt. When you remove the solenoid be careful not to change position of the gear.
Figure 7

8) Unsoldering part - top cover has to be removed, because it is where the soldering pads are (Figure 8). Again be very careful - don't overheat - just touch with soldering iron and simultaneously remove the wires. BTW this is the part where HUMAN SR becomes handy. If something doesn't goes right - don't force it - let it cool and try again later.
Figure 8

9) Now let's look at both solenoids side by side (Figure 9)
Figure 9

As you can see - the dimensions are the same - color of wires is the same - so it is 1:1 replacement - both in K50/500 and K100D purple goes back to purple, pink goes back to pink.
10) So it is obvious that we put the better part from the K100D inside K50/500 where it will function as it should. When I checked the green friend I found that the magnetic attraction was really strong...the white friend could be taken appart considerably easier. So as I didn't want to limit functionality of my K100D, I decided to put the green friend back for opening the flash - as it is not such a crucial place (basically I have never used the built in flash). But before I did it - I used the "filing-trimming" method on the horse-shoe ends. You don't need to file a lot - just a bit (Fig. 10 shows my approach). After filing the force that hold it in place became considerably weaker...so I thought - good enough - and put it back in K100D, where it indeed works like intended.
Figure 10

So to put everything back you need to work in reverse order. Word of caution - when putting back the front cover - pay attention to the AF-switch...The equilibrium position is C.AF - move the switch on the cover in C.AF position and move the actual switch on the body also in its middle position - it will help to get the front cover on with the first time and not to take it off when you discover that something is wrong with the AF switch.
I hope this can help someone who is ready to try this operation. There is just no need to let a good camera loose some of its functionality.
UPDATE:
I did a bit of digging about solenoid part and I came up with some links for you. Still it is not that easy to buy just one single solenoid for a regular person, but - here is the info:
1) Part made in South Korea
2) Alibaba offering what I guess is the same as above
3) Summit electronics - this I think is already known
4) Maotech with some extended specifications
So I suppose these can be ordered just in large quantities. My guess is that for a regular person who doesn't have an old K100D or doesn't want to apply the "filing mod" (as it might not be a permanent fix, as reported by some people) the best thing is to hunt for a cheap (used) DVD or CD drive from laptop. I did a quick search and managed to find something as cheap as $5 on ebay. But - unfortunately these drives can utilize different solenoids so it is a lottery to some extent.
|
|
Forum: Lens Clubs
12-20-2008, 07:07 PM
|
| |
Tair-3FS (F4.5/300) - great lens, only a bit heavy and diaphragm adjustments are weird.
Full frame - resized

Full frane - resized
Previous - cropped

Croped
"Astro" image - croped

I love this lens. I also like Jupiter-37A - these two are quite often used lenses on my K100D body. As what goes for MIR-1B - quite crappy lens but still usable now and then (but DA kit is still better).
|
|
Forum: Pentax K-30 & K-50
02-11-2017, 05:29 PM
|
| |
I think someone didn't quite got the figurative speech and took things too bluntly. It doesn't matter weather Ricoh manufactures solenoids or sources them somewhere - as people say - S**T has happened, and now it should be cleaned up. It would be only polite if Ricoh publicly would announce that there has been a problem, they know the cause, and people do not need to panic or worry, because all current models have quality parts in them. I haven't seen such an announcement - and I think it casts an unpleasant shadow on Ricoh. Doubts have been seeded - and they are serious (looking through Russian forums - many people report this problem - also K500 are massively affected). People are becoming hesitant of buying another Pentax - especially entry level camera. I hope this is not a part of their long-term strategy to sell more K3s and KPs... :)
|
|
Forum: Pentax SLR Lens Discussion
02-22-2017, 04:13 AM
|
| |
I hope this can help
You Tube
|
src="https://www.youtube.com/embed/Hfx8ZaQDzhI?controls=1" allowfullscreen>
|
Anyway - the keywords you are looking for are: Разборка Гелиос 44-2
|
|
Forum: Pentax K-30 & K-50
02-22-2017, 12:18 AM
|
| |
White friend=white solenoid (old version)
Green friend=green solenoid (new version)
They both consist of 2 parts - the coil assembly and the plunger.
Taking apart=separate the two.
I can't give you numeric values for the force the parts were holding together - I can just provide subjective (but pretty objective) evaluation:
White - sticks together nicely, holds rather strong but comes apart also reasonably well (taking into account the scale of the parts)
Green - at first I thought I would need to go after a tool (some small pliers or smth.) because the very first Idea was - my fingers are slipping, but when I overcame the first resistance (As you know how it is with magnets) it came out easily.
Green - after modification - after filing the horseshoe ends the parts could be separated a lot easier - even easier than on the white solenoid.
My observation is that there is no issue with alignment or friction - it is purely a magnetic phenomenon. I have long forgotten my magnetism and induction related physics but I still can speculate (or we might come to a definite conclusion together):
The material of the plunger on the green one could be different - and it could have a larger magnetizability (than the part on the white one) - meaning that the induced magnetic moment would also be larger - thus the force of attraction becomes larger. As electromagnet has to overcome this, it might pose a problem. I suppose that when you leave your camera unattended (not in use) for a prolonged period (as I did when my problems started) the induced magnetic moment can increase due to "interesting" properties (maybe even time-dependent and drifting) of the material - thus the parts stick together. Also the magnet on the green one seems pretty strong.
What else - at first I thought it might have a connection but I couldn't figure out how it would impact anything - look at the side by side image - pay a close attention to the upper part of solenoids (where the screw mounts are) - you will see that the white one has rather wide "bridge" at the top most end while the green one has 2 thin "bridges" connecting both sides. But as I said - I have forgotten my magnet-physics and with what I do remember I couldn't figure out how this would impact anything.
|
|
Forum: Photo Critique
06-14-2018, 11:46 AM
|
| |
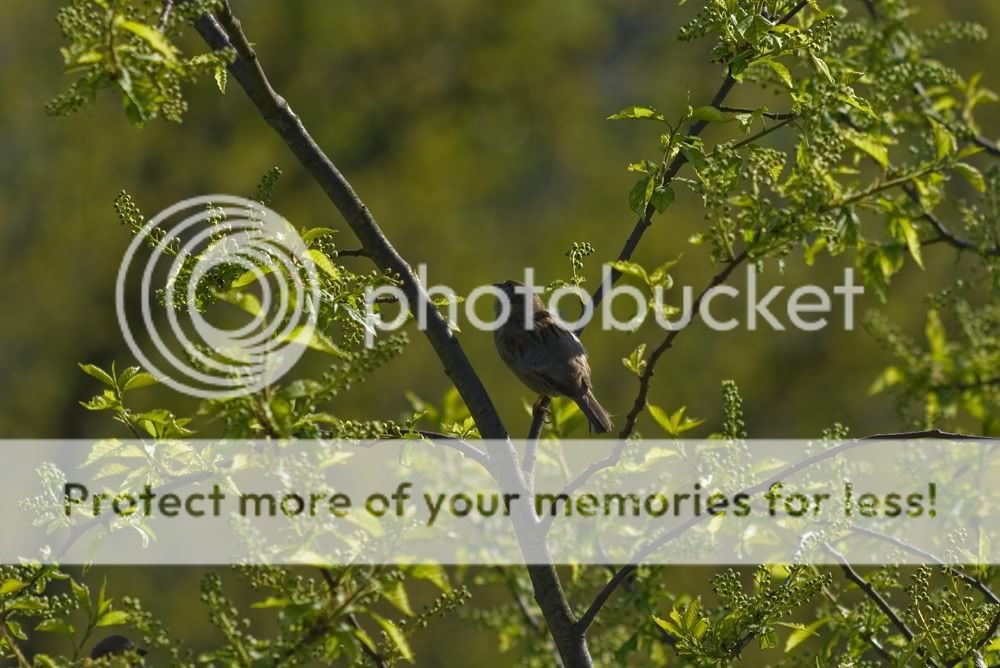
I would say there is too much space which draws the eye away from the main subject. A tighter (most likely vertical) crop would add to the overall presentation of otherwise great capture. Maybe a slight tweak with contrast, selective saturation would also be beneficial.
Overall very nice capture.
|
|
Forum: Pentax K-30 & K-50
02-22-2017, 09:32 AM
|
| |
1) Power circuit - doesn't explain anything - with a changed solenoid (from K100D) everything works perfectly. If in the beginning it worked well in tandem with the green coil, then the obviously most likely something has changed in the green solenoid - or at least it is the faulty part.
2) You didn't understand my point with magnetization - I am talking about INDUCED MAGNETIC MOMENT which becomes ZERRO when you remove an external magnetic field. I will give you an example - Let's take a regular bolt (regular steel) and let's take a bolt made out of stainless steel. Now take a permanent magnet - which bolt will stick to the magnet with higher force? Bingo - the regular one. So the cores of transformers are not made out of stainless steel but instead iron - because you can magnetize it to a higher degree. My Idea is that the inner structure (on microscopic scale) of the horse-shoe material (metal) somehow changes with time and in presence of external magnetic field (the permanent magnet which is attached at the top). I don't know - lets call it a magnetic "creep" - I can't think of better comparison. Like with mechanical creep - there are materials which don't creep and there are materials with very strong creep - like all superplastic materials. So back to magnets - the magnetization of the core (horse-shoe) increases with time thus making the attractive force also stronger - does it now makes sense? And when you remove the horseshoe from the field of the permanent magnet then its total magnetic moment again collapses to zero. The horse-shoe part doesn't need to become a weak permanent magnet itself for the attractive force to increase!
3) There is no mechanism that pulls the horse-shoe out - it is a PUSH-type solenoid. Electromagnet part pushes the horse-shoe out and the permanent magnet sucks it back in. I suppose that the current pulse on the solenoid is so short that it cannot manage to overcome extra force - this is why when you do a burst set - it starts to work for a while...you apply subsequent "demagnetization" thus weakening the attractive force and at some point it starts to work properly again.
|
|
Forum: Pentax K-30 & K-50
03-23-2017, 07:42 AM
|
| |
For K50 you can get an off-brand AA adapter for $2 and eneloops - one of the best solutions.
Regarding off-brand Li-Ion...don't go with a high-capacity noname - they tend to bloat - 1) it is dangerous, 2) it is hard to extract the battery from the compartment if it happens. For Li-Ion I would go with Ansmann or something along those lines - they are lower capacity and more expensive but you get a quality product. No more cheapo Li-Ions for me - they just bloat.
|
|
Forum: Pentax DSLR Discussion
02-05-2017, 03:37 PM
|
| |
I have an almost 10 year old K100D and a bit younger K100D Super...Overall everything works fine. Then I have 2.5 year old K500 - manufactured on Feb27 2014 - after 4100 shutter clicks it has developed the dark frame error. Personally I think there probably are some "bad batches" of aperture mechanism - for those it is only when and not if (no connection to shutter clicks - instead a time dependent process [my idea, if you have seen any DIY threads dealing with this problem, is that the responsible metal part magnetizes over time thus increasing the force, but I might be wrong]) . Fortunately if things get worse (and I am sure they will), it is possible to correct for this error DIY style.
Personally as the risk is great - I wouldn't buy any more K50, K500, K30 or models known to develop this issue.
If I were in your shoes I would go with K3 ii without blinking. Now with the KP around the corner a price drop on the K3ii might be possible making this choice even more attractive. Yes - heavier, but 200k shutter clicks, better AF, better metering, more quiet shutter, support of KAF4, and other good things.
|
|
Forum: Pentax K-30 & K-50
02-22-2017, 04:22 AM
|
| |
1) Yes the hole in which is the screw is reversed - in the flash mechanism of K100D it is on the left while in the aperture mechanism of K50/500 it is on the right side, but that is just how these solenoids are mounted in each place - the important thing is - the diameter of holes is the same.
2) The second hole is used to fix the solenoid in place - it doesn't use a screw but instead there is a Plastic pin on the body (of K100D and K50/500) of camera - so no guide rails are required.
3) So when you place back the solenoid inside K100D, it is important to clean the holes.
|
|
Forum: Pentax K-30 & K-50
02-21-2017, 12:12 AM
|
| |
I don't want to think about it ... but I guess it could be a way to enforce planned obsolescence. Older pentaxes are quite durable and robust. Ok there is a huge difference in image quality, resolution, AF etc etc when you compare K100 to K500 but nowadays the improvements (considering final image) are marginal and many people can come to a conclusion that they don't need extra 8 Mpx in the K3 - basically for many there is no obvious reason to buy a new camera every couple of years - especially if they have initially decided to go with the entry level model (for Sunday shooters shutter life of any dslr is more than enough to last for years and years). So this might be an attempt to stimulate the buyer to choose a new body, especially if he has invested in lenses...Anyway...it is better than to put a time-bomb in the firmware.
Lately I have noticed that many things go out of order just basically right after the warranty has ran out - I have had 3 point-n-shoots over the years go nuts just after some 2 to 2.5 years of use (HP and Canon). And now entry level Pentax.... coincidence?
|
|
Forum: Post Your Photos!
02-17-2017, 05:30 AM
|
| |
Some really nice technique!
I have a provocative question - why pentax?
|
|
Forum: Pentax SLR Lens Discussion
02-07-2017, 05:58 AM
|
| |
I wouldn't buy 20-40 limited...The focal range that it covers is not very convenient. If it was something like 12-35 mm or 15-35 mm, then it would be of interest. I also wouldn't buy HD 15 limited - it is not that good of a lens optically.
Your subjects and interests should dictate what is your most immediate lens purchase. As you haven't discussed it - it is hard to suggest something.
A very good all-around lens is HD 35 mm macro limited, also the HD 21mm limited is a great choice (gives you a field of view close to what you see with your eyes on APS-C). If you are more into people and portraits then FA77 limited would be a fine choice but HD 70 limited also provides very pleasant results plus it has quick-shift and focuses faster. Some people find ~100 mm macro lenses to be very handy - good for wildlife (some birds which are not very shy), for macro - flowers, bugs as well as portraits.
If i were you I would probably pass on FA77 and HD 20-40 at the first iteration and I would pass on 40mm pancake entirely. You can get maybe DA70+HD21 at first or some other combo - depends on your needs and interests.
|


