Forgot Password
Pentax Camera Forums Home
 
Log in or register to remove ads.

Showing results 1 to 25 of 114 Search: Liked Posts
Forum: Digital Processing, Software, and Printing 10-17-2017, 07:11 PM  
Lightroom Woes
Posted By stevebrot
Replies: 23
Views: 2,528
This is pretty much the rule. The in-camera histogram is based on the preview JPEG, which in turn reflects the JPEG image settings. Lightroom's, OTOH, is based on its RAW conversion as modified by the import profile and whatever settings applied in PP.


What import profile are you using? If other than Adobe Standard, you might want to switch to that.


Those profiles only apply to in-camera JPEG, in-camera RAW conversion, in-camera image review (JPEG and RAW), and RAW conversion using the Pentax software that came with your camera. In other words, proprietary Pentax stuff. Lightroom does not have the means to reproduce them for RAW conversion* and simply ignores them.


Steve

* This is generally the case, though Lightroom does have Pentax-provided import profiles that correspond to several of the custom image settings for several cameras. I don't remember if those include the K-30/K-50 models.
Forum: Site Suggestions and Help 10-14-2017, 07:01 AM  
Question How can I recover my "Pentaxian" status?
Posted By Unregistered User 8
Replies: 15
Views: 1,967
Hi Francisco, from the list here, once you get 15 likes again your Pentaxian status should be restored. :cool:
Forum: Photographic Industry and Professionals 04-15-2017, 06:00 PM  
Yosemite - Pre Ansel Adams
Posted By cali92rs
Replies: 5
Views: 1,582
Being from California, I have also been interested in its history.
Here is a vid about Carleton Watkins who photographed Yosemite in the mid 1800s.
The detail in his shots are amazing!

https://timeline.com/carleton-watkins-yosemite-national-park-photography-env...y-f3af50acd509
Forum: Pentax Mirrorless Cameras 10-11-2016, 10:35 PM  
Home-made K-01 Underwater housing
Posted By Focusrite
Replies: 17
Views: 11,963
A couple more since I haven't figured out whether you can post more than 5 pics in the one post!
Forum: Pentax Mirrorless Cameras 10-11-2016, 10:30 PM  
Home-made K-01 Underwater housing
Posted By Focusrite
Replies: 17
Views: 11,963
All shots taken with Sigma 18-35 f1.8. All underwater shots taken with K-01.
Forum: Pentax Mirrorless Cameras 10-11-2016, 10:22 PM  
Home-made K-01 Underwater housing
Posted By Focusrite
Replies: 17
Views: 11,963
A few months back I asked a few questions on another thread about some of the practicalities of making an underwater housing for a K-01, and I promised that if I did get around to making something that I would create a separate thread for it; so here are some pics of the build, the final result, and my thoughts about its use thus far.

I described my idea as being a "simple box", but it turned out to be a little more elaborate than what some people may have expected! The plans were drawn up from a set of measurements I had taken of the camera and selected lens, and most of the planning was done sketching in 1:1 size on a piece of A4 paper. I made it out of stainless steel, as I would sooner trust TIG welded stainless over any sort of plastic welding that I would be able to do, and the fact that at my workplace has most of the tools and equipment to fabricate it out of stainless made the decision easier. The stainless sheet itself was an old electrical/pneumatic instrumentation box that I salvaged from a scrap bin. The box was in a pretty corrosive area, so there was plenty of scaling I had to buff off and plenty of pitting underneath that, but the parent metal was in good enough shape all-in-all. The sheet is approximately 1.2mm thick. The housing body is made of one piece of sheet that I folded into shape to minimize any welds that were necessary. It's far from perfect, since all I had to bend it was a workbench, two F-clamps and a length of angle iron. The end result is a little out-of-square, but good enough.

The flanges on both ends of the box are 3mm stainless ( again salvaged from the scrap bin ), which hold a 3mm rubber gasket and a 5mm Plexiglass sheet with 6mm stainless steel bolts. I glued some bits of rubber on the inside of the housing to space the camera body and lens away from making contact with the steel. I also glued some black rubber sheeting around the inside of the front of the housing to cut down on any annoying light reflections from the stainless steel that might affect the lens.

The only moving part of the setup is a lever that operates the shutter button; I had no other controls in place that could manipulate the camera once it was sealed inside the housing. The lever that triggers the shutter button is a piece of bent 5mm stainless rod that passes through a small housing with 4 x O-rings sealing against it. The O-rings are held and compressed inside their housing by a 12mm stainless grub screw that has a hole drilled in its centre to allow the rod to pass through. This setup allows for a very high amount of finesse and feedback when depressing the shutter button since you aren't fighting against a spring in the lever.

I didn't have much of a chance to actually field test the housing before going on a dive trip to the Great Barrier Reef last month. A couple of mates and I spent 3 days on a live-aboard boat and I made a total of 11 dives on the reef down to a max depth of 18 metres. I first took the housing down without the camera in it for a couple of dives until I had tested it at our max dive depth. I then decided to use it with the camera and my [I]second[I] ( and much cheaper ) choice of lens, which was an older Sigma 105mm f2.8 macro. This precipitated an unfortunate event, as I had not designed the length of the box to accommodate the full length of the lens barrel when it focuses at a close object. I didn't expect this to be a problem, and I ( foolishly ) didn't set the focus limiter either; with a little earlier testing I found I could still focus on objects about 300mm away without the lens barrel needing to reach its full extension. The problem was that the lens didn't know that. Once I was underwater I tried to focus on something, and the lens racked through its entire focal range. The barrel hit the inside of the front Perspex panel and pushed the camera body back against the rear Perspex panel. It must have hit the Playback button, and so I had a bricked camera at 18 metres that I could do nothing to fix!

After that I put the lens on the K-01 that I had actually designed the case for - the Sigma 18-35 f1.8. I was a little weary of having a relatively expensive lens in there, but it performed really well. The only other issues were my use of Auto mode, which doesn't seem to allow you to select the preferred focal point? After that I put it in Av ( in hindsight, Tv might have been better ) and used the centre focal point. The camera bricked up on me again on one occasion, but I had left it on standby inside the housing overnight and it may have objected to that.

I got a lot of curious looks from fellow divers. The finished product looks pretty butch, but it's a WWI tank compared to the sleek Icalite case my dive buddy was using for his Nikon. The weight of the case wasn't a problem, as it was only slightly below buoyancy in the water. Since I was probably slightly under-weighted with my kit in the water anyway, the little bit of extra weight actually helped me control my buoyancy in the water.

As for my underwater photography experience, I have mixed feelings. The GB Reef is beautiful, but you lose colour very quickly at that depth and most of the fish there are so small that shooting with a 28mm FF equivalent makes it hard to capture marine life that isn't much bigger than a matchbox. The Sigma 18-35 close-focusing ability does help, but getting close to fragile coral formations is difficult for a new diver. Capturing photos of fellow divers ( since they are bigger and slower than the fish ) is much easier!

I'm already thinking about a Mk.II case, but the only features I think I'll change/add will be a geared setup for being able to control the lens' zoom function, perhaps a better way to seal the back of the housing ( tightening/undoing all those nuts/bolts is a bit of a chore ), and ( probably more importantly ) a way to use an external strobe with the camera, as that would make all the difference for capturing colour in the coral and fish. A change in lens would be handy as well; something like the Sigma 17-70 would probably be more ideal with the extra reach. Or maybe I'll just buy another camera that already has underwater housings available! That's all someways down the path in the future, though!
Forum: Photography Articles 06-23-2015, 03:35 PM  
The Role of ISO Sensitivity
Posted By dosdan
Replies: 10
Views: 4,228
I believe that the 2 roles of ISO Sensitivity in a digital camera need to be understood. Maximising the Photometric Exposure (the number of photons per unit sensor area captured during the duration of the exposure) leads to the best ratio of wanted Image to unwanted Shot Noise. Changing the ISO does not directly affect the exposure. Instead, it alters the metering point offset in the camera, and the gain applied. However, it is routinely claimed on many web pages and even in some "authoritative" books that ISO directly affects exposure. Indeed, it is often stated that it is part of "The Exposure Triangle". This misconception causes confusion, particularly when you start shooting in raw (PEF/DNG). So, rather than having to later unlearn what we thought ISO Sensitivity does, and then relearn it, as many of us have had to do, I think it's better to understand the role of ISO correctly from the start. The aim of this article is to help the reader develop a "Photonic" or "Exposure-centric" mindset, rather than a "ISO-centric" one.

The variation of gain in the digital imagining chain serves two purposes:

  1. To increase the brightness values when recording the data.

  2. To reduce late-stage noise contributions, usually from the ADC.


The Photometric Exposure is determined solely by the Scene Luminance, f-number (more properly, the T-number which accounts for the light loss in the lens) and the Shutter Speed. These 3 parameters alone determine how many photons are captured per unit area during the exposure period.

The size of the sensor comes into play when considering the Total Light i.e. the total number of photons captured during the exposure period. Since Exposure is a density metric (photons per unit area), multiplying it by the number of "unit areas" in a particular sensor format gives the Total Light value. This also means that, for the same Scene Luminance, using the same camera settings (e.g. 1/100s & f/5.6) results in the sensors in P&S, Micro-4/3, APS-C, FF & MF cameras all receiving the same exposure (the same photonic density), assuming that the lenses have the same light transmission losses, but the bigger sensors will receive greater Total Light (more photons in total), and thus will achieve better Image-to-Shot Noise ratios.

The number of photons captured determines:

  1. The Shot Noise SNR. Light itself is noisy, but the Signal-to-Shot Noise Ratio improves with the sq-root of number of photons, (or from the sensor, photo-electons ("e-")), captured e.g. 10,000e- captured = SNR of 100:1, while 40,000e- = SNR of 200:1. So the larger the exposure, the better the Shot Noise SNR.

  2. More photons captured produces a larger signal from the sensor. For the same mapping of the sensor output signal to the image brightness, more signal means a brighter rendered image.


In LL or action situations, you reach a stage where you no longer want to lower the SS further, or can open the lens aperture (actually the iris) up further to get a "decently" exposed image i.e. one which will produce a bright enough review image in the camera's LCD and from its JPEG engine. So to make the rendered image brighter, you have 2 options:

  1. Shoot in raw, and during PP use the raw developer's "Exposure" control (a misnomer since it doesn't increase the number of photons captured, only the mapping of the brightness values in the captured image data to the rendered output brightness).

  2. Use the camera's ISO control to do the same thing in the camera. This can be done in the analogue domain (applied in discrete ISO steps), amplifying the signal between the sensor and the ADC by the use of an intermediate PGA (Programmable Gain Amplifier) stage. Or it can be done in the digital domain by just multiplying the brightness values stored in the image file.


Regardless of which method is used, for the same exposure level, the rendered image values in an ISO1600 image have 16x times the brightness value compared to the ISO100 version of the same scene. The same applies to the output image produced from the development of an ISO100 raw image, after being digitally boosted 4 stops (16x).

So increasing the ISO compensates for weaker & weaker exposures, which would otherwise be rendered as dimmer & dimmer images. But since the Shot Noise SNR is already "set like a fly in amber" during the exposure capture process, the increasing gain also brings up the shot noise in the image data. It doesn't change the Shot Noise SNR, because you're increasing both the wanted image and the unwanted shot noise by the same amount, but the relatively high amount of shot noise in the weak-exposure image is now brighter, so it is more obvious. This is why weak exposure/high ISO shots look noisier than strong exposure/low ISO shots. As discussed next, increasing the ISO also amplifies the Sensor Read Noise, along with the signal. Normally, the sensor RN is not significant, but with a weak exposure comes a weak image output from the sensor, so the unwanted fixed-level sensor output (sensor RN) is now more obvious too.

The other use of analogue (but not digital) gain is to reduce the contribution of ADC noise to the total read noise (Total RN). The 3 stages in a simplified digital imaging system are:

Sensor -> PGA -> ADC

Each stage contributes noise. Noise components from these 3 stages, if uncorrelated (i.e. random and not harmonically related to each other), are combined in quadrature using RMS (root-mean-square).

The noise contribution from the PGA can be split up into input-stage noise & output-stage noise, with only the input-stage noise being amplified by the PGA. To simplify things further, the PGA input-stage noise can be lumped in with sensor read noise, and the PGA output-stage noise can be included with the ADC noise.

The combined noise from these 3 stages is known as Total RN, which is (simplified):

Total RN = sq-root(Sensor RN^2 + ADC Noise^2).

If the noise is measured using "input-referencing" (as if it was another signal originating from inside the sensor), it can be quoted in units of photoelectrons (e-).
An example: if Sensor RN = 3e- and ADC Noise = 4e-, Total RN = sq-root(9 +16) = 5e-.

It is convenient to reference the various sources of noise in the imaging system back to the input side, as this is the location of the wanted (image photoelectrons) signal, and the SNR can easily be determined.

The fact that some of the noise is amplified by the PGA, and some isn't, complicates matters and means that the Total RN changes with the amount of analogue gain applied. (Analogue gain is typically used for low & mid ISO changes.)

So for example, at ISO200, with 2x relative gain compared to ISO100 applied to the sensor signal, the Total RN, if input-referenced, is:

sq-root(3^2 + (4/2)^2) = 3.32e-

Now both Sensor RN and ADC noise themselves are fixed, but since we're referencing from the input side, the fixed ADC noise appears to drop with increasing ISO. This is the reason the [Total] RN figures shown at www.sensorgen.info, which are input-referenced, drop with increasing ISO. The ADC noise doesn't really change, but you can see that the relative contribution of the ADC Noise to the Total RN decreases with ISO.

If instead we were to look at the noise after the analogue amplification stage, the Sensor RN would appear to rise with ISO e.g. at ISO200:

sq-root((3*2)^2 + 4^2) = 7.2e-

Again, the Sensor RN itself doesn't really change, but you can see that its relative contribution, after amplification, to the Total RN increases with ISO.

The Dynamic Range curve in DxOMark data gives an idea of the contributions from these 2 noise sources when compared against the maximum signal level i.e. the distance between the noise floor compared against the highest possible brightness before either the pixel fills up, or the ADC clips (exceeds a 12-bit or 14-bit number).

Inspect the DR curve below. The FWC (Full-Well Capacity) of the pixel here is 48,000e-.


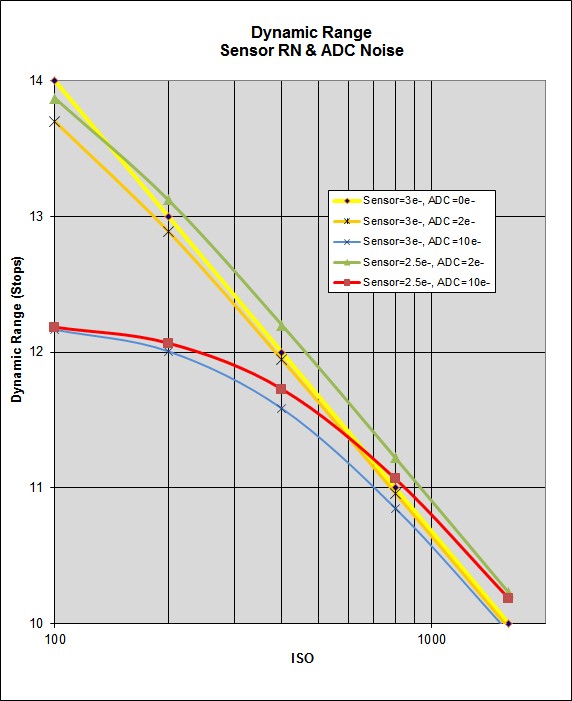
Look at the Sensor 3e-, ADC 0e- (yellow) curve. While no digital image system can have only Sensor RN and zero ADC noise, if it were to have just 3e- RN from the sensor the max. possible DR ratio, using a max. FWC value of 48,000e-, and the min. value where the noise floor was 3e-, would be 48,000:3 = 16,000:1. Expressing in photographic stops (powers of 2) that's log2(16000) = 14 stops. Notice that the line is straight and falls exactly 1 stop for each doubling of ISO. The reason for this fall is that at the lowest ISO, the system is set up so the max. ADC value is reached close to when the pixel reaches FWC. So, the FWC approx. matches FS DN (the full-scale digital number). Now, neither the FWC nor FS change with the increase in ISO. But when we double the relative gain, i.e. change from ISO100->ISO200, it will no longer be possible for FWC to be reached at FS. Instead, the ADC will clip when the pixel contains only 24,000e-. (Remember that the reason we've upping the ISO is because we're dealing with a weaker exposure, with less photons being captured, and so have "less-well-filled" pixels.) So increasing the ISO means that the digital imaging system's FS is reached with smaller and smaller amounts in the pixel, hence the continual reduction of the max. signal from the sensor, and its ratio compared to the noise floor.

Now look at Sensor 3e-, ADC 10e- (blue curve). Historically ADC noise has been relatively high compared to the sensor RN. This leads to a flattening of the DR curve at low ISO where the ADC noise (not being amplified by the PGA) dominates the Total RN. Most Canon DSLRs still have flattened DR curves, indicating that the noise contribution from the ADC is relatively high.

The Sensor 3e-, ADC 2e- (orange) curve shows a lack of flattening (divergence from flat-line). Most modern DSLRs are tending towards this as ADC noise performance improves.

The red & green curves show the effect of decreasing the Sensor RN with both high & low ADC noise. This increases DR. For example, if it was Sensor 2.5e-, ADC 0e- (not shown on the graph), the DR here would be 48,000:2.5 = 19,200:1 = 14.23 stops. Canon DSLR sensors tend to have better Sensor RN than other brands, so you'll often hear the term "High ISO DR" used with Canons, because at high ISOs the amplified sensor RN is the dominant component in the Total RN.

These figures are for illustration purposes only. Here are some ballpark figures from actual cameras. These were determined by solving the curve-fits of data from Sensorgen - digital camera sensor data, which in turn analyses DxO data. These are older APS-C models, but the situation hasn't changed greatly:

K-5
FWC: 47159e-
Sensor RN: 2.4e-
ADC Noise: 2.7e-

60D
FWC: 24322e-
Sensor RN: 2.4e-
ADC Noise: 13e-

The way analogue gain improves the Total RN is by raising the sensor output above the ADC noise floor. Think of the ADC operational input range as a window, with a relatively noisy ADC having a higher window-sill height. The more ADC noise there is, the more pressing the need to boost the weak-exposure sensor signal first before passing it on to the ADC. However, once the amplified Sensor RN dominates the Total RN, any further gain, either analogue or digital, just increases the Total RN at the same rate as the signal. So there is no further improvement in SNR.

You can see this in the DR curve, when the curve becomes straight-line. This is what DPReview is examining in their ISO Invariance tests. As the ISO is increased, once the DR curve gets close to straight-line, there is no further need to apply analogue gain to improve the Total RN - just using digital gain will suffice to increase the rendered brightness.

The reason for the desirability of knowing from which ISO analogue gain is no longer beneficial, is that DR drops off with increasing ISO, as already explained. By shooting raw at base ISO or close to it, you have more headroom during the capture phase. You can then apply digital gain in PP to bring up the rendered brightness. Now, if there's a prominent highlight, you run the same risk of blowing it when you apply the same amount of boost in PP to get the overall image to the same rendered brightness as if you had shot at high ISO in the first place. But since the highlight is less likely to have been clipped already in the low-ISO capture, you stand a better chance of preserving it, when brightening in PP, by fiddling with the Tone Response Curve (TRC) being applied. So shooting this way gives you more flexibility afterwards in PP and can act as a form of highlight preservation.

Finally, the DxOMark DR measurements shown under the "Screen" tab, not the default "Print" tab, give you the pixel-level DR (i.e. they have not be normalised to account for different sensor sizes and MPixels). This value is a reasonable proxy for the ENOB (Effective Number Of Bits) performance of the digital imaging system.

Examples:

K-5: 13.61 stops
60D: 10.91 stops

Both cameras have 14-bit raw formats which, if the ADCs & sensors were completely noiseless, would result in 14-bit ENOBs. The closeness of the K5's ENOB to the raw format bit-depth means that this is a good candidate for "ISOless" or "ISO-invariant" shooting, and that it reaches straight-line DR performance relatively quickly above base ISO.

Some further reading:

An example of a K-5 ISO100 + 4-stops boost vs the same exposure at ISO1600: https://www.pentaxforums.com/forums/61-post-processing-articles/234154-invest...-boosting.html

Example of the "soft limit" to Ssat (Sensitivity based on system saturation) caused by the increasing non-linearity as the sensor's FWC is approached and an example of the "hard limit" to Ssat caused by running out of bits:

How to Measure Full Well Capacity (1)
How to Measure Full Well Capacity (2)

Compare the 1st & 2nd graphs in these 2 blogs. The difference is caused by the application of 2x analogue gain. Quoting:
Note: the data shown in Figures 1 and 2 are obtained from the same sensor, with the same light input. The difference between the two measurements is a difference in camera setting, such that the analog gain of the sensor and the reference voltage of the ADC result in an overall camera gain difference of a factor of 2.
ISO Sensitivity and Exposure Index | imatest

______________________________________________________________________________________________________________________________


I'll now provide 2 examples of the confusion caused by including ISO Sensitivity in "The Exposure Triangle".

Example 1 - Equivalent Exposures


Shoot the same scene with two different camera settings:

(1) 1/100s, f/4, ISO100

(2) 1/400s, f/4, ISO400

If ISO affected the exposure, then these two settings would produce "equivalent exposures". But they don't. Setting #1 captures 4x the photons captured by #2. Since SNR due to shot noise is the sq-root of the number of photons, #1 will have 2x better Shot Noise SNR than #2. For example, if a pixel exposed using #1 captures 40,000e- (photo-electrons), it has a photonic SNR of 200:1. While in #2, there would be 10,000e- captured, with a SNR of 100:1.

So these two settings don't produce equivalent exposures. Instead they produce equivalently bright images, when rendered.

When you take a shot there are two main steps involved:

  1. The sensor is exposed for a certain duration, using a certain aperture, resulting in the capture of a certain amount of light.

  2. This capture is then rendered to a JPEG for both storage on the memory card and to provide a review image on the back LCD screen. The capture was linear i.e 2x more photons produces a 2x stronger signal. But the eye sees brightness logarithmically. Demosaicing, colour-space conversion, a TRC (including Gamma to map the linear sensor response to log values), bit-reduction/lossy compression are applied to get 14-bit raw data from the sensor down to the 8-bits per primary colour JPEG format.


If you shoot JPEG, these two process occur together. So exposing and rendering are not distinctly separated, either temporally or conceptually. It's just taking "an exposure".

But if you shoot raw, the capture phase occurs in the camera, while the rendering phase is delayed until later when you do the PP. As a raw shooter, I take "Exposure" to specifically refer to the light-capturing process. This is when the intrinsic quality of the image is determined. It's "All about the Light". The rendering of this exposure is for another time. So raw shooters should be mindful of capturing the most photons they can in an exposure, not how bright the image will later turn out to be.

The distinction between the capturing & rendering processes was more obvious in the days of film, where you took an exposure and later developed it. At which time you could apply some darkroom magic to alter the final image's brightness.


Example 2 - ETTR

If you think that ISO affects exposure you can get confused about Exposing to the Right (ETTR). I think everyone is in agreement with maximising the number of photons captured during an exposure. This is the gist of ETTR where a user pushes the histogram as far to the RHS as possible without noticeably blowing highlights. (A certain number of highlights in a capture may end up clipped without being noticeable/objectionable.) But ETTR only makes sense at base ISO. When your exposure is no longer sufficient to "well fill" the pixels, and the histogram peak(s) are a long way from the RHS, you can then increase ISO in the camera to move the histogram, but not the exposure, to the right.

Doing so will:

  1. Increases the rendered brightness of the review image, and JPEG if you shoot in that format.

  2. Up to a certain point, reduces the contribution of the ADC noise to the Total RN.

  3. Moves the AE meter to the right.

  4. Increase the likelihood that some/more of the very brightest image pixels will be clipped.


Again, confusion over this is caused by not understanding the role of ISO in determining the rendering brightness rather than affecting the exposure. It demonstrates the problem caused by adopting an ISO-centric instead of an Exposure-centric mindset.

Dan.
Forum: Canon, Nikon, Sony, and Other Camera Brands 06-03-2015, 02:25 AM  
Telescope using 10 - Canon 400mm f/2.8L IS II lenses
Posted By interested_observer
Replies: 0
Views: 931
I just ran into another item about a similar scope - well, actually there are two of them, using 8-200/f1.8 lenses for planet hunting.
:cool:
Forum: Pentax SLR Lens Discussion 05-31-2015, 09:28 PM  
Figuring out Da 15 focusing - How I did it
Posted By bpv_UW
Replies: 12
Views: 2,091
I first acquired a Da 15 limited a little over 4 years ago, and have owned one (a couple different copies) for most of the time in between. I've shot thousands of images with it. While it has a laundry list of great characteristics: size/weight, flare resistance, colors, contrast, center sharpness, etc, I have always been frustrated with it's edge/corner performance. I shoot landscapes, so edge-to-edge, front-to-back sharpness is important, and I require large DOF. I've spent more hours contemplating other K-mount wide angle options than I care to admit because, despite my best efforts, I often have ended up with images from the Da 15 that I really like, but on closer inspection have areas on the borders/corners that are disappointingly blurred. I tried the Da 12-24 for a bit and liked it, but sold it as I ultimately didn't think the size/weight sacrifice was worth it for me. While I've known, academically, that field curvature of the Da 15 was likely causing some of my frustrations, I hadn't gone through any sort of testing process to see if I can confirm this. Earlier this evening, I spent about a half an hour putting the lens through its paces to try and clarify the field curvature issue a bit. I thought I'd post my process here, in case anyone out there is having the same frustrations I have had. Warning: this is by no means scientific, but it's at least somewhat systematic, and I feel like I understand the lens much better now than I did before. Note this was done with a K3. Here goes...

1) Find a suitable subject. I went to a local park and found a wide open area where I had grass in the foreground, a walking path/trees/lake in the midground, and a line of foothills/mountains in the background. I oriented myself so that I was shooting in a direction perpendicular to the mountain range in the background (so the mountains on the far left and far right sides of the frame were approximately the same distance from my camera). I positioned my camera low to the ground, on a tripod, so that the elements in the frame ranged from about 2 feet from the front element to infinity.

2) Place camera on tripod, set exposure mode to manual (M), set drive mode to 2-second delay.

3) Determine smallest aperture that gives a suitably sharp result for your purposes (before diffraction begins to degrade image sharpness to an unacceptable degree). This will obviously be subjective. For me, I began at f/5.6 and (after confirming that the hard stop at infinity was accurate on my lens' focus scale) manually focused to infinity and shot an image. I then shot identical images at f/8, f/9.5, f/11, f/13, f/14, and f/16. I reviewed the images, zooming in to 100% in the rear LCD and looking at the portion of the background mountain range (i.e. infinity) at the center of the frame (about 1/3 of the way from the top of the frame in my composition). Once I could see a noticeable drop-off in sharpness in this region between one image and the next, I considered that my limit. For my lens and purposes, I was able to go to f/11 without much effect from diffraction. I thus determined that this was the smallest aperture I would be willing to use when taking a landscape image.

4) Determine how close you can focus before the borders at infinity begin to degrade due to the lens' field curvature. I began by manually focusing to infinity hard stop using f/11 aperture. I then took several images, each subsequent one focused slightly closer, noting with each where the focus was set on the focus scale. I found that I barely had to move focus off the infinity hard stop before the edges at infinity began to degrade noticeably, whereas the center at infinity did not degrade for much longer - this is the field curvature of the lens coming into play. Once I determined how close I could focus before the infinity edges began to degrade, I set the focus scale to that point, took an image, and examined the foreground at 100%. I found that the image was sharp from about 6-8 feet to infinity. Everything closer to the camera was noticeably blurred. I then experimented with progressively closer focal points, to see if I could take another single image with all the remaining foreground elements in focus. By the time I focused close enough to get the immediate foreground elements in focus, the edges at 6-8 feet had begun to degrade slightly, even though the center at 6-8 feet looked great (again, this is the field curvature rearing its head).

I ultimately discovered that, for my purposes, when taking a landscape image on a tripod, I can shoot 2 images (f/11, first image with L side of infinity symbol aligned with f/4 mark on distance scale, second image with L side of infinity symbol aligned with f/16 mark on distance scale), and after focus-stacking in PP, emerge with all elements from about 2 feet to infinity, across the frame, sharp. For compositions with elements closer to the camera than 2 feet, more images will be required. With a bit more playing around, I also determined what the best single-image compromise for my purposes is: f/14 (not much change in sharpness due to diffraction...I found this became much more pronounced at f/16 and beyond), L side of infinity symbol aligned with f/8 mark on distance scale (this will do a reasonable job getting everything from 2 feet to infinity in focus, though the infinity borders and the immediate foreground will be a bit soft).


So what did I learn?

1) For landscape shooting with high DOF requirements and critical sharpness needed across the frame, the Da 15 will not likely be able to achieve this with a single image. You'll either need to focus stack, or sacrifice sharpness in some parts of the image. For me, there are enough other pros to the Da 15 (primarily size/weight, which blows any other wide K-mount lens out of the water) that I'll be keeping it and becoming adept at focus stacking when I really need critical sharpness across the frame.

2) Most of the border/corner sharpness issues that I've observed with the Da 15 relate to field curvature, not to the border/corner performance of the lens per se. Put another way, it is capable of producing border and (all but extreme) corner resolution that is pretty good.

3) From here on out, when I shoot with the Da 15 (in most circumstances), I'll be using MF, and will be leveraging the settings I determined above. No AF, no focusing in Live View, just MF using the distance scale on the lens. I now know exactly how my copy performs and how to get what I want from it.

4) It is important to test your lenses systematically to learn how to get the best out of them. I should have done this with the Da 15 years ago.

Hope this is helpful for someone...

Brandon
Forum: Photographic Technique 05-26-2015, 10:02 PM  
9 Composition Tips (ft. Steve McCurry)
Posted By alamo5000
Replies: 0
Views: 1,389


You Tube


Forum: Post Your Photos! 05-15-2015, 07:28 AM  
Not Work-Safe Ladies Liberty
Posted By Sandy Hancock
Replies: 10
Views: 479
They are wearing pants. A bare-chested man could walk around there with impunity. That is the point.

Free the nipple.
Forum: Pentax DSLR Discussion 05-04-2015, 01:22 PM  
K3 "optimum" ISO?
Posted By MJSfoto1956
Replies: 15
Views: 4,724
The best way to think of ISO is an inverse mapping to maximum print size for the gear at hand (obviously dependent on whatever lens+body combination you are currently using).

For example, if at ISO 100 you determine that your gear can make a quality 22"x33" print, then at ISO 400 the same scene might max out at 16"x24" print size, likewise at ISO 1600 it might max out at 10"x15", and finally at ISO 6400 might max out at 4"x6". My suggestion is to simply shoot different subjects at all different ISO values, then print them out at different sizes and see what your gear is capable of (and your tastes will allow). You might find you LIKE the look of noisy images, in which case you can print bigger (and you can safely ignore ISO settings altogether)!

Michael
Forum: Canon, Nikon, Sony, and Other Camera Brands 04-27-2015, 04:56 PM  
6 generations of Exmor technology
Posted By dosdan
Replies: 1
Views: 1,039
A very nice article from FRAMOS explaining the differences in the 6 generations of Sony Exmor sensor technology:

https://www.framos.com/en/news/news/single-view/article/what-is-sonys-technology-anyway.html


Dan.
Forum: General Talk 04-16-2015, 12:26 AM  
Today is a Very Special Day!
Posted By Dewman
Replies: 7
Views: 1,223
Today is my daughter's 40th birthday! My oh my, how the time flies. I can remember like it was yesterday, pacing the floor outside the maternity ward at Memorial Hospital in Modesto, California, waiting for her to enter my life. She has been such a blessing and not a day goes by that I don't marvel at her kindness and courage.


She contracted leukemia when she was 5 years old and she had only a 40% chance of survival. But, through an aggressive treatment of chemo and radiation, the miracle workers at Stanford Children's Hospital were able to get her into remission. We were told that if she stayed there for 6 years, she would be officially "cured." But, they warned, if she were to slip out of remission, it would be the beginning of the end of her life. So, for 6 long, harrowing years, we struggled to carry on with life, but every waking minute of every long, endless day, the terrifying thought of loosing my little blue-eyed, flaxen-haired princess was an endless burden I carried with me. It was, without a doubt, the most trying time of my life.


But, The Big Chief in the Sky decided that he just couldn't take her from me and on that glorious day, 6 years later, I told every person who crossed my path what a wonderful day it was..... and why! Miracles DO happen! The crowning jewel to this story is..... we were told that, because of the chemo and radiation, she would be unable to bear children. Hmmm.... WRONG! My granddaughter, Kelsey, will celebrate her 20th birthday on the 3rd of next month! So, Happy Birthday Baby! Mere words can't begin to express how much you mean to me.
Forum: Canon, Nikon, Sony, and Other Camera Brands 04-02-2015, 07:55 AM  
The Foveon Club: Life Unfiltered
Posted By pinholecam
Replies: 949
Views: 154,662

DP1M0869 - DP1M0871-1 by jenkwang, on Flickr


3 vertical frames with the Sigma DP1m
Full sized image in the Flickr link (go check it out to see what the fuss is about the Foveon sensor)
Forum: Film Processing, Scanning, and Darkroom 02-28-2015, 07:06 PM  
All About Film: Ilford FP4+
Posted By K David
Replies: 8
Views: 1,765
Last night I published a new video in an ongoing series I'm doing called All About Film (AAF.) AAF will look at in-production films and provide technical and practical advice and tips with sample images and technical explanations.

Here's my first one, FP4+:


You Tube


Forum: Post Your Photos! 11-10-2014, 10:18 AM  
Abstract My upcoming trip!
Posted By olegp
Replies: 9
Views: 1,261
Traveller's life kit :D
It's fresh! :)
Thanks!
Forum: Post Your Photos! 11-10-2014, 08:25 AM  
Abstract My upcoming trip!
Posted By Jean Poitiers
Replies: 9
Views: 1,261
That's fun and great idea ... TFS, J
Forum: Post Your Photos! 11-10-2014, 06:48 AM  
Abstract My upcoming trip!
Posted By Rimfiredude
Replies: 9
Views: 1,261
I will be following you on FB.
Forum: Welcomes and Introductions 11-05-2014, 07:48 AM  
Introducing my "Hometown Photography Series" project
Posted By TER-OR
Replies: 12
Views: 1,059
We live in a river valley, so sunrise and sunset are not easy. But we're on a major migratory pathway so we get plenty of birds and other wildlife, and storms -though the valley interferes a bit with view. I will eventually get some lightning shots via bulb mode. We have some great prairie areas here - some very good reconstruction being done - which I need to photograph. When you're in a vibrant, living, healthy prairie your senses are on overload with all the flowers, insects, birds and if you're lucky some other animals make their presence known.

Pictures from the area:
https://www.flickr.com/gp/ter-or/4SB7Qb
Pictures from Starved Rock:
https://www.flickr.com/gp/ter-or/3Cp5SW

Forum: General Photography 10-30-2014, 09:26 AM  
Gear Advice. Tree month trip to Europe. What gear to take.
Posted By Macario
Replies: 16
Views: 2,357
well, there is always a very easy solution this. Just concentrate on the gear you have with you, and forget about the gear you left behind. makes you think more creatively.
Forum: Lens Clubs 10-25-2014, 09:19 AM  
The 15mm Limited controls my mind - club
Posted By Rondec
Replies: 12,402
Views: 2,290,181
Sorry.
Forum: Lens Clubs 10-25-2014, 08:45 AM  
The 15mm Limited controls my mind - club
Posted By kh1234567890
Replies: 12,402
Views: 2,290,181
The second one is pretty boring ...
Forum: Lens Clubs 10-23-2014, 08:54 AM  
The 15mm Limited controls my mind - club
Posted By todd
Replies: 12,402
Views: 2,290,181
honeymoon with a human, or with the lens? :D awesome photos! I'm gonna track you down on flickr too!

Here's one I may have posted earlier in the year, but I reprocessed it using the gimp exposure blend script (and other stuff) and I like the result..
Forum: Pentax Forums Giveaways 10-20-2014, 08:26 PM  
Poll: Lens Tournament: DA 21mm F3.2 vs K 28mm F3.5
Posted By luftfluss
Replies: 26
Views: 6,467
So could the DA21...

:lol:
Search took 0.01 seconds | Showing results 1 to 25 of 114

 
Forum Jump


All times are GMT -7. The time now is 09:47 AM. | See also: NikonForums.com, CanonForums.com part of our network of photo forums!
  • Red (Default)
  • Green
  • Gray
  • Dark
  • Dark Yellow
  • Dark Blue
  • Old Red
  • Old Green
  • Old Gray
  • Dial-Up Style
Hello! It's great to see you back on the forum! Have you considered joining the community?
register
Creating a FREE ACCOUNT takes under a minute, removes ads, and lets you post! [Dismiss]
Top