
The Power of Adobe's Lightroom
By PF Staff in Influential Photo Gear on Dec 29, 2012
If I had to pick out a single piece of photography equipment or software that has made the biggest positive impact on photographic workflow, it would be Adobe Lightroom. The ability to perform edits on raw files provides the power and flexibility necessary to fix the inevitable exposure problems associated with landscape photography, where the photographer cannot control the light of his subject. Lightroom, when combined with the superb dynamic range of a camera like the Pentax K-5, provides the tools necessary to rectify those situations when the camera sees the light quite differently from the naked eye. It allows the boring, flat image on the left to be transformed into the image on the right:
 Click to enlarge
The image on the right is a lot closer to what the scene looked like to the naked eye. The camera over-exposed the sky, turning it into a white mess. But with Lightroom I could bring the original color back the sky and spruce up the other colors in the photograph, bringing more life and snap to the image.
I shot film for years. With color film, particularly color slide film, your ability to do post-processing work was virtually non-existent. Black and white provided a bit more PP wiggle room, but the various tools one's disposal, such as dodging and burning in the darkroom, were rather crude and required a great deal of skill and practice to master. Lightroom provides me with the tools I need to quite easily make changes that with film would have been mostly impossible. There's a Himalayan difference between what I was getting with film and what I can get with digital. While not all that difference can be attributed to Lightroom, it nonetheless deserves the lion's share of the credit.
Lightroom is a software package that combines file organization of images with the Adobe Raw Converter and several other modules. The raw converter, contained in the "Develop" module, is the key component for me, although the Library, Map and Web modules also are powerful and useful. The Develop module gives you a place for your image along side a series of panels containing sliders that allow for various adjustments to exposure, white balance, color, sharpening, noise reduction, vignetting, lens correction, etc. Since these adjustments are made to the actual data contained in the raw file, there is a significantly wider latitude of adjustment that can be made to a given file — especially in comparison to, say, tiff files in Photoshop. Lightroom even allows for some localized editing through its Graduated Filter and Adjustment Brush options. And in Lightroom 4, these tools have become even more powerful. You can not only adjust exposure, contrast, and saturation, but also white balance, noise, and even moire. Below is a screenshot of the Graduated Filter being used in the Develop Module:
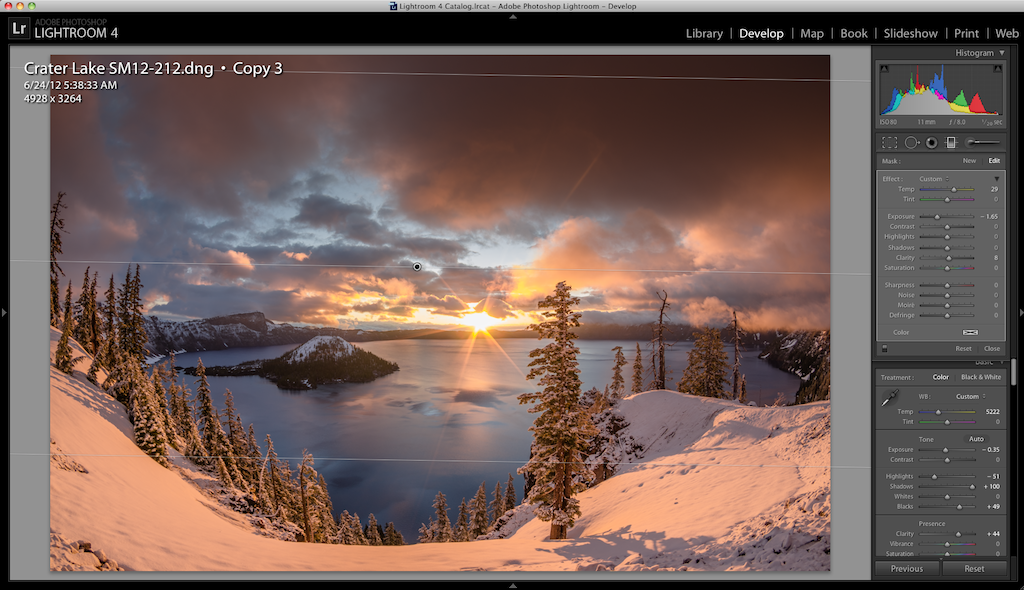 Click to enlarge
In the Develop module, I rely primarily on the various tools for adjusting and fine-tuning exposure. These include controls of exposure, contrast, highlights, shadows, whites, blacks, and tone curve. There also powerful tools for adjusting color, including white balance and a series of sliders tuned to broad color groups, such as red, orange, yellow, green, aqua, blue, purple and magenta. I use these controls sparingly, as they can easily lead, when overused, to undesirable results. I rely on the quality of the light of the scene being photographed combined with the color rendition of the lens used to capture that scene to get the colors I want. Exposure edits are the primary means by which I draw out the colors I regard as critical to the aesthetic of the image.
Although a number of products help me make the images I want, none quite equals, let alone surpasses, what Lightroom has done for my photography.
More from the Pentax Forums Homepage
- Pentax Limited Lens Referral Giveaway
- March 2024 "Flowers up Close" Photo...
- Ricoh updates the K-1, K-1 II, GR III, GR IIIx
- March "Flowers up Close" Contest...
- HD FA 50mm F1.4 vs. SMC 50mm F1.4 Classic Review
- Announcing Our April, 2024 Photo Contest
- Introducing Pentaxify AI by PentaxForums.com
- The Making of "Autumn Draws"
 Various writers regularly contribute articles to the Pentax Forums homepage blog. More recent articles are published under each author's forum username. We hope you enjoy our guides and news...
Comments