
Pentax K-3 Review
User Interface
The K-3's interface is very similar to that of other current Pentax DSLRs. The K-3 menus are essentially a mix of the K-5 interface and the K-50 interface, with a few new screens and settings as needed.
One key thing we'd like to mention in this section is that the K-3's larger 3.2" LCD screen is a big upgrade. Even though its resolution (pixel density) could have been higher (it has 1037k dots vs. the K-5's 921k dots), the key selling point is that the new screen has a 3:2 aspect ratio. This means that the live view image as well as images in playback mode will fill the entire screen! The increased area is of course also a plus.
When viewing images in playback mode, the K-3 now tells you when you've reached 100% magnification (on 24-megapixel files, a "100%" icon is shown at 8.3x zoom). This will give users peace-of-mind as overzoom might make images look worse than they actually are.
 Thanks to the screen's 3:2 aspect ratio, you won't be seeing any black bars in live view or playback mode
With our discussion of the screen out of the way, let's get back to the user interface itself. Overall, the interface is just as user-friendly as it's always been, but a few key changes have been made that will affect the way you use the camera. The most important change is connected to the new button layout for setting autofocus mode, metering pattern, and movie mode.
Setting Autofocus Modes
 To change AF modes, you must now hold down the AF Mode button on the side of the camera while simultaneously turning the front control wheel (to cycle through AF.A, AF.S, and AF.C) or the rear control wheel (to cycle through AF point selection).
The AF mode button must be held down during the adjustment process. We would prefer to just have to push it and then have a set time available for doing the adjustment. This is how the ISO and EV adjustment buttons work. This lack of consistency in the user interface is unfortunate; we hope that this issue will be taken care of via a firmware upgrade.
During the adjustment process, the settings are shown in the viewfinder, on the top LCD, and the rear LCD, if enabled. When the camera reverts to shooting mode the AF mode is only shown on the rear LCD, if enabled.
 |  |
| Top LCD and rear LCD indications while holding down the AF mode button | |
Having a physical switch for the AF mode settings would have been nice, but it was inevitable, though, that Pentax had to do away with the switch as it would have been hard to accommodate more than 3 focus modes on a physical switch. Still, the new interface for AF does slow things down some. It also introduces a bit of button duplication: for example, the 4-way pad cannot be used to access sub-menus as long as AF SEL mode is highlighted.
AF mode and AF point selection can also be set from the Control Panel.
Setting Metering Pattern
 Now that the mechanical switch below the mode dial is being used for disabling the mode dial lock, setting of the metering pattern has been relocated to a push button combined with rotating the rear e-dial. The button must be held down while the rear e-dial is rotated to change setting. Just like for the AF mode button, this behavior is inconsistent with other buttons on the camera. We hope to see both corrected in a future firmware update.
The meter pattern selected is shown in 3 locations: on the top LCD, in the viewfinder, and the rear LCD status screen, if enabled.
 |  |
| Top LCD and rear LCD indications while holding down the metering mode button | |
Pentax forgot to add an arrow that points at the metering symbol on the top LCD when holding down the metering button (a minor inconsistency, as the arrow is shown for shutter speed, aperture, ISO, memory cards, and AF modes). They got it right on the rear LCD, though.
Movie/Live View Switch
 Many have been asking how the new Stills/Video switch works. It's simple: when the switch is set to stills (i.e. pushed downwards), the red button toggles live view mode. When the switch is set to video, live view engages automatically, and the red button controls when recording stops and ends.
In video mode, the info button will automatically pull up a dedicated info screen for video mode. The Stills/Video switch design isn't thought through to the end as you cannot capture stills while in video mode, and you cannot capture videos while in regular live view.
While in live view, the K-3 supports extra features such as a grid overlay, shadow/highlight exposure alerts, and focus peaking. Another feature that lurks deep inside the live view menu is called Composition Adjustment, which lets you shift the camera's sensor in any direction in order to widen field of view or correct perspective distortion. We elaborate on this unique feature in a tutorial.
 K-3 Live View Menu
The K-3's live view display behaves just like it did on earlier Pentax bodies: it does not offer a real-time preview of the actual exposure. Instead, it always tries to keep the scene properly-exposed and this impacts the utility of the histogram and highlight alert features.
Button and Dial Functions
All buttons and dials except for the front e-dial and lens release buttons are located on the top, the back, or the left hand side of the camera.

On the top plate from left to right we find:
- Mode dial with lock button in the center
- Switch to disengage the locking function
- Exposure value compensation. Click on the button, then turn the rear e-dial to set, or hit the green button to reset to 0 (no EV compensation)
- ISO adjustment: Click on the button, then turn the rear e-dial to set the ISO or hit the green button to engage auto ISO
- Shutter release
- On/Off/Depth of Field (DoF) preview switch. The DoF position can be customized to provide a digital preview instead (i.e. capture the image without storing it)
 On the back we find (left to right, top to bottom):
- Play: Review the images and movies on the active SD card
- The new meter button, explained above. In playback mode this button deletes images and movies
- Viewfinder diopter adjustment. On previous Pentax DLSRs this was a sliding switch and somewhat fiddly to use. The new design is an improvement. The adjustment range is -2 to +1.5
- Red button: Live view/recording start button, explained above
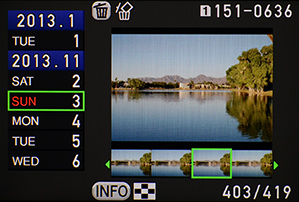
- Rear e-dial. In shooting mode its main function is to control the aperture, but it also controls a multitude of other parameters. Its function can be customized. In playback mode it zooms in/out on the image being shown. Continuing to zoom out switches to folder view, and zooming out even further yields calendar view, a feature that allows you to navigate the contents of the memory card by date.
- AF button. By default it engages the autofocus system, but it can be customized and even be set to act differently when shooting in Live View shooting versus when shooting with the Viewfinder. The AF button is more conveniently placed than on the K-5, thus improving the ergonomics
- AE-L: Auto exposure lock. Pressing this button locks the current meter reading for a set time
- Green button: Its main function is to reset various shooting parameters. With legacy lenses with aperture rings but no "A" position, the green button is used for stop-down metering
- The new Movie/Stills switch, explained above
- The four way pad is used to navigate the menu screens or move the autofocus point. In shooting mode the four buttons provide direct access to these settings (unless you are in the AF point selection mode):
- Drive mode (refer to the explanation later in this review)
- Image finishing tone (Bright, natural, monochrome, etc.)
- Flash settings (auto, red eye, trailing curtain, slow sync, wireless, flash exposure compensation)
- White balance
- INFO
- Brings up the Control Panel ("info screen") from which a host of parameters can be set (as shown below)
- In live view and movie modes, a separate Control Panel screen is shown after pressing this button
- In live view, pressing this button twice will allow you to enable/disable shooting information overlay
- MENU: Enters the menu system or exits out of various pages
- AF point selection: Enables/disables moving the focus point with the four way pad. In playback mode it toggles between the two SD cards
- This button is active even if the rear LCD status screen is disabled. This means that you can activate focus point selection and use the viewfinder rather than the LCD to select the desired AF point if desired. After pressing this button, the 4-way pad cannot be used to access the WB, flash, drive mode, and custom image sub-menus until it is pressed a second time, so you must remember to do so after you've selected the desired AF point. This confusion could easily be avoided if the rear LCD were automatically enabled while selecting AF points, thus alerting the photographer that the primary function of the 4-way pad is disabled. Pentax could also add a timeout for the button's effect via a firmware update. An icon is in the viewfinder indicates whenever select mode is active, so this is only an issue when you're caught off-guard and just want to change some settings.
Various buttons and dials are duplicated on the optional battery grip for convenient vertical shooting.
 K-3 Button Customization Menu
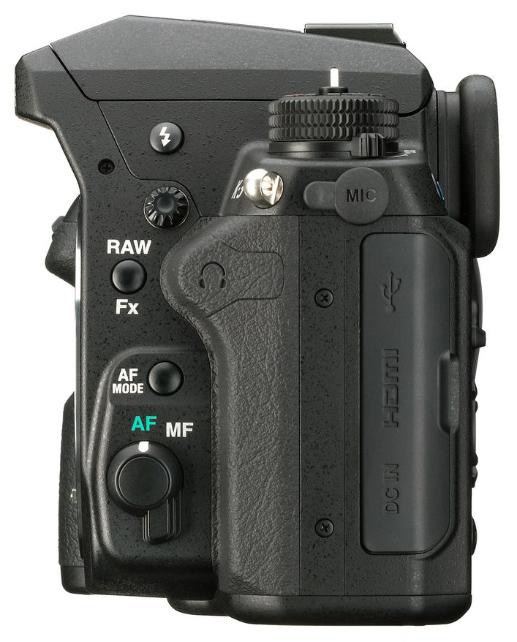 On the left hand side we find, going top to bottom:
- Flash button: Pops up the built-in flash (mechanical)
- RAW/Fx button: In its default mode it switches from JPG to RAW for the next one image only. It can be customized to leave the setting as RAW or RAW+ instead. It can also be set to perform other functions:
- Open the exposure bracketing screen*
- Depth of Field preview
- Digital preview
- Turn shake reduction on/off
- Turn the top LCD panel illumination on/off
- AF Mode, discussed above
- AF/MF switch
*Regrettably, though, it takes 6 button pushes to cancel bracketing and revert to single image shooting! It would be a good extra use of the green button if it could back out through all these layers in the exposure bracketing menu with one push.
Status Screen
Status of various shooting settings can be displayed on the rear monitor. Most of what's shown is a duplication of the information on the top LCD, but it is very useful to have this information on the back when shooting on a tall tripod for example. At other times it is annoying that this screen comes on, but it is easily disabled by hitting INFO twice and selecting it off.
The Status Screen has a second function which turns on when the AF point button is pressed. The screen then enlarges the display of the focus points making it easy to move the points or select a cluster.
 |  |
| Regular Status Screen | AF mode adjustment is active |
Control Panel
Clicking the INFO button brings up the Control Panel. The actual contents of the panel depends on whether the camera is in still image shooting mode or movie mode. Here we shall only discuss the former, refer the movie page for the latter. The sample screen shots below illustrate how to set various parameters. Note the helpful hints - the icon for the parameter(s) being changed have an e-dial symbol so you easily can see which dial to turn and for what. The Control Panel screen is self explanatory and convenient to use.
 |  |
 |  |
The MENU button exits out of the Control Panel. Or you can hit the INFO button again, allowing you to select whether or not to show the Status Screen in shooting mode, and if so, how much information to include. Additionally, from this screen you have the option to select the electronic level to help vertically and horizontally level your shots (most effective when used while mounted on a tripod), and the final button allows for a compass and coordinate reading. This right-most button will be greyed out and inaccessible unless you have the optional Pentax O-GPS 1 accessory mounted to the hotshoe.
 After hitting INFO a second time
Setting the White Balance
Hitting the white balance button (the left button on the four way pad) brings up a screen from which one can select the white balance and make a number of tweaks to the color temperature.
 |  |
| Hit the down arrow to select between the two AWB modes | Left/right arrow to select the sub-mode |
 |  |
| Hitting INFO allows for color temperature fine tuning | Hitting the preview button shows the setting's effect |
 |  |
|  |
Vertical Shooting
Many key screens rotate for vertical shooting as illustrated here:
 |  |
| Control Panel / "Info Screen" | Status Screen |
While Pentax was at it, they went all the way! The screen also adjusts to being held upside down as shown here with the electronic level. The electronic level, in addition to allowing you to hold the camera steadily, adds an automatic horizon correction feature that straightens your images when possible.

Images will also rotate in playback mode, but the corresponding metadata does not. This feature from the older Pentax K-7 has finally been brought back!
Menu System
The main menu system is accessible via the MENU button. The menu system has a tabbed layout and it allows you to control everything found on the info screen, and much more. Because many features in the menu were added incrementally and they evolved over time, parts of the menu system are laid out a bit illogically. It is at times difficult to understand why a particular item is found in the record menu and not under the custom settings, and vice-versa.
Image capture menu: | |
 |  |
 |  |
Movie menu: | Playback menu: |
 |  |
Setup menu: | |
 |  |
 |  |
Custom functions: | |
 |  |
 |  |
Complexity
The sheer number of features packed into the K-3 gives rise to increased complexity. Almost every menu screen now has more fields and more settings, which makes things a bit harder to navigate on the fly.
 |  |
| The drive mode and info screen menus are now littered with options | |
Interval shooting and multiple exposures are now part of the drive mode menu, and the info screen grid now contains many more options. The same goes for the K-3's main menu tabs and playback mode info screen. Like on the K-50, the info button in playback mode no longer allows you to cycle through info screens directly. Instead, it brings up a sub-menu that requires you to select the desired tab (a mild nuisance).
The added menu complexity does bring some nice additions, however: new to the K-3 is a dedicated vignetting correction setting, which was previously linked to the distortion correction setting.
The K-3 does include a simplification for beginners: selecting highlight correction will no longer prevent you from accessing ISO 100, as it did on previous models. This feature will simply not operate at minimum ISO, as it requires ISO 200 or higher.
Overall, you do need to spend a bit of time to get accustomed to the K-3's facelifted interface. After a while with your camera, finding the right settings becomes second nature, and at that point you can start taking full advantage of Pentax's intuitive interface.
Playback Mode
The playback mode on the K-3 is very similar to what we've seen on previous bodies, but a few key changes have been made. First of all, it has become slightly more tedious to switch between various information displays while in playback mode. On older Pentax bodies, the info button simply caused the camera to cycle between the different screens. Now, the info button brings up a pop-up menu, and you must select the desired screen using the 4-way pad or e-dial, and then confirm using the OK button. This adds two extra button presses if you just want to view detailed metadata, for instance.
 Intermediate Info Screen Menu in Playback Mode
The 4 other info screens are otherwise unchanged. We have detailed information, a master histogram, RBG histograms, and no information at all:
 |  |
 |  |
While viewing an image, the rear e-dial can be used to zoom in on fine details while the front e-dial cycles through photos, which is very handy.

An image zoomed to 2x. (8.3x is 100%)
Zooming out while viewing the whole image lets you access the thumnail view. The K-3 can display 6, 12, 20, 35, or 81 thumbnails at a time (the default is 20). This gives you much more flexibility than on the K-5, but is overwise similar to what we've seen in Pentax's recent entry-level DSLRs like the K-50 or K-500. To change the number of thumbnails shown, press the info button while in the thumbnail view.
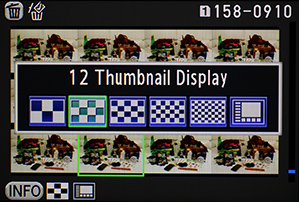 |  |
 |  |
| The various multi-image display options | |
There is also a calendar view which allows you to more easily select photos by date, as shown above.
Pressing the down button while viewing an image will bring up the retouch menu, shown below.

K-3 Retouch Menu
The retouch menu allows you do make the following adjustments:
- Rotation
- Digital filters
- Moire correction
- Resizing
- Cropping
- Index image
- Protect
- Slideshow
- Manual white balance
- Cross processing
- RAW development (discussed on the image quality page)
- Movie trimming
- Copy to other SD card
- Share via Eye-Fi
Edited images are always saved as a copy.
LCD Screen
The K-3 allows users to adjust the rear screen's brightness, contrast, and colors. You can also choose one of 12 background colors used throughout various displays. Thanks to these settings, you can set up the screen so that it's easy for you to read and use.
 |  |
| K-3 Display Options | |
Verdict
The K-3's user interface is well laid out in the usual Pentax way which is intuitive and user friendly. With this particular camera we must say, though, that complexity has gone up and can be a bit overwhelming at first. Switching between playback mode screens has become slightly more tedious, and due to button duplication, you might be caught off-guard when accessing some of the camera's functions, based on the current context. Overall, though, we're happy to see that the the K-5's aging interface has finally been modernized.


