
Pentax K-70 Review
Recommended Settings
Any time you start shooting with a new camera—whether you're upgrading or entirely new to the brand—there are a plethora of settings to adjust. To help get you started as quickly as possible, we're offering recommendations for ideal K-70 settings. They'll (hopefully) help you save time and improve the quality of your photos.
Record Menu Settings
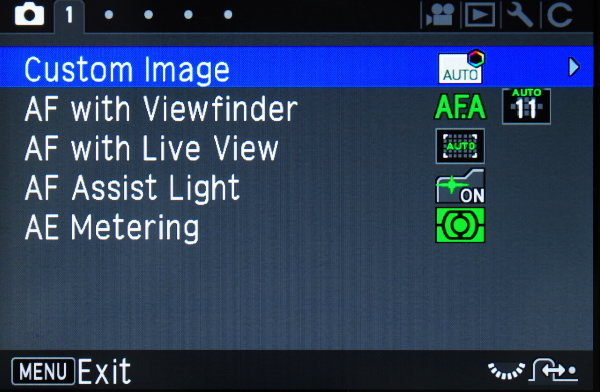 If you prefer to shoot in JPEG mode, customize your Custom Image profile and save a few presets in the U1, U2, and U3 modes based on the types of subjects you photograph most frequently. The bright and natural presets are good starting points.
- When shooting with primes, turn the sharpness setting in your Custom Image profile all the way down to avoid over-sharpened images
- Most novice users should stick to using the default Auto 11 autofocus option, at least at first. More advanced users can explore Focus Point-Select AF, though many will prefer to use the center point and recompose. These options can be found under AF with Viewfinder on the first page of the Record menu, within the AF active area setting.
- Select AF.S in the previously-mentioned AF with Viewfinder menu unless you're shooting moving subjects, in which case you should opt for AF.C.
- To improve your focus accuracy, enable Focus Peaking under AF with Live View on first page of the Record menu. Remember that you can zoom in using the OK button while outside of multi-point SEL AF.
- You can also choose a different Contrast AF method within the AF with Live View submenu, if you so desire. The default is Face Detect, which is great for people shots but somewhat limiting otherwise. For everyday shooting we prefer Auto mode, which lets you select the size and location of the AF area. The SEL mode is useful when you're on a tripod and want to precisely pinpoint your subject.
- To speed up image processing and display times, disable Distortion Correction under the Lens Correction submenu on page 4 of the Record menu. You can always enable it if needed via the control panel, in case your lens has severe distortion. (Or shoot RAW and correct the distortion in your editing suite of choice.)
- We are split on Instant Review (page 5 of the Record menu)—some prefer to leave it at 1 second, while others feel that's not enough time to check for fine sharpness and prefer 3 seconds. Try both and see what you prefer.
- If you prefer to shoot in Av mode, consider disabling instant review, since the rear e-dial will zoom in on the captured image rather than change the working aperture while the image is displayed.
- Inside the Memory submenu (page 5 of the Record menu), ensure that Pixel Shift is unchecked, so it doesn't get left on by mistake. Uncheck any other settings you don't want the camera to remember when you turn it off.
- Once you get accustomed to the camera, you can disable the Guide Display by going to the fifth page of the Record menu, entering the Other Display Settings submenu, and unchecking Guide Display. (Otherwise, the guide display pops up every time you switch shooting modes.)
- If you're in the USA, Canada, or another country where the electrical frequency is 60Hz, you should set Flicker Reduction to 60Hz inside the Live View submenu on page 5 of the Record menu. Otherwise, leave it on 50Hz.
Movie Menu Settings
- Select the resolution and framerate you prefer. HD/60p is ideal for fast-moving subjects while Full HD delivers more detail at the expense of a slower framerate and/or interlacing.
- Disable Movie SR to reduce the jello effect during video recording.
- Under AF with Live View, we recommend avoiding AF.C, as it doesn't work very well. It's better to pre-focus with AF.S and then manually focus once you start rolling.
Playback Menu Settings
- If you like to check the sharpness of your shots immediately after taking them, we suggest that you set Quick Zoom to 100% (8.3x). This gives you a quick pixel-level view of the shot being reviewed when you turn the rear e-dial just one click.
Setup Menu Settings
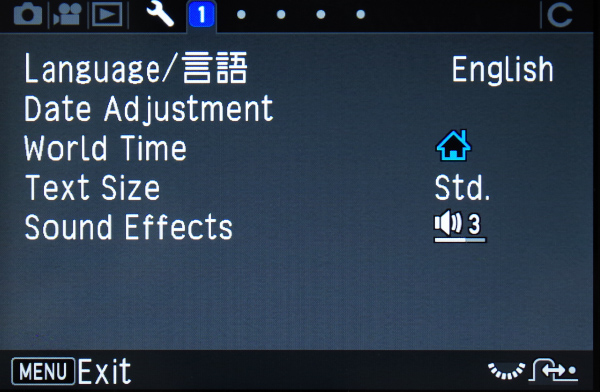 If you want to keep your K-70 silent but deadly, we recommend turning the Volume all the way down under Sound Effects on page 1 of the Setup menu.
- In order to save battery power, we recommend leaving Auto Power Off at the default setting of 1 minute.
- If you want to mark your photos for all to see, you can enter your Copyright Information on page 4 of the Setup menu.
- To keep your sensor clean, enable startup or shutdown Dust Removal (or both) on the fifth page of the Setup menu. Finally, whenever you switch lenses, be sure to turn your camera off first, as this will help prevent dust from sticking to the sensor.
Custom Menu Settings
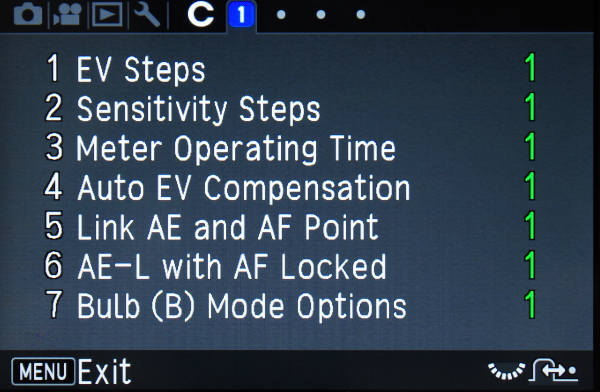 We like to have as fine control over our settings as is possible. Therefore, we recommend setting EV Steps (C1) to "1/3 EV Steps," and setting Sensitivity Steps (C2) to "As EV Steps."
- To make menu navigation more convenient, set Save Menu Location (C21) to "Save Menu Location." With this setting enabled, whenever you hit the Menu button, the camera will return to your previous place.
- If you plan to shoot a lot of action shots with manual focus lenses, you may want to enable Catch-in Focus (C22). With this feature enabled and in AF.S mode, you can hold down the shutter release and the camera will fire the shutter the moment the subject comes into focus. Read our catch in focus guide.
- One of the headline features of any Pentax DSLR is its compatibility with decades' worth of manual-focus K-mount lenses. If you plan on shooting with manual lenses, go into the custom function menu and set Using Aperture Ring (C24) to "Enable." Manual lens usage guide.
Other Settings
- Since the K-70's high-ISO performance is so good, we suggest you leave Auto-ISO engaged for most day-to-day shooting. Set a maximum ISO setting you're comfortable with (we like ISO 6400) and just fire away. For more controlled shooting, you can easily switch to a specific ISO setting. Adjust these options in the ISO submenu (reached by pressing up on the d-pad).
If you've found a particular setting configuration to work exceptionally well, feel free to share it with our community in the K-70 forum!

